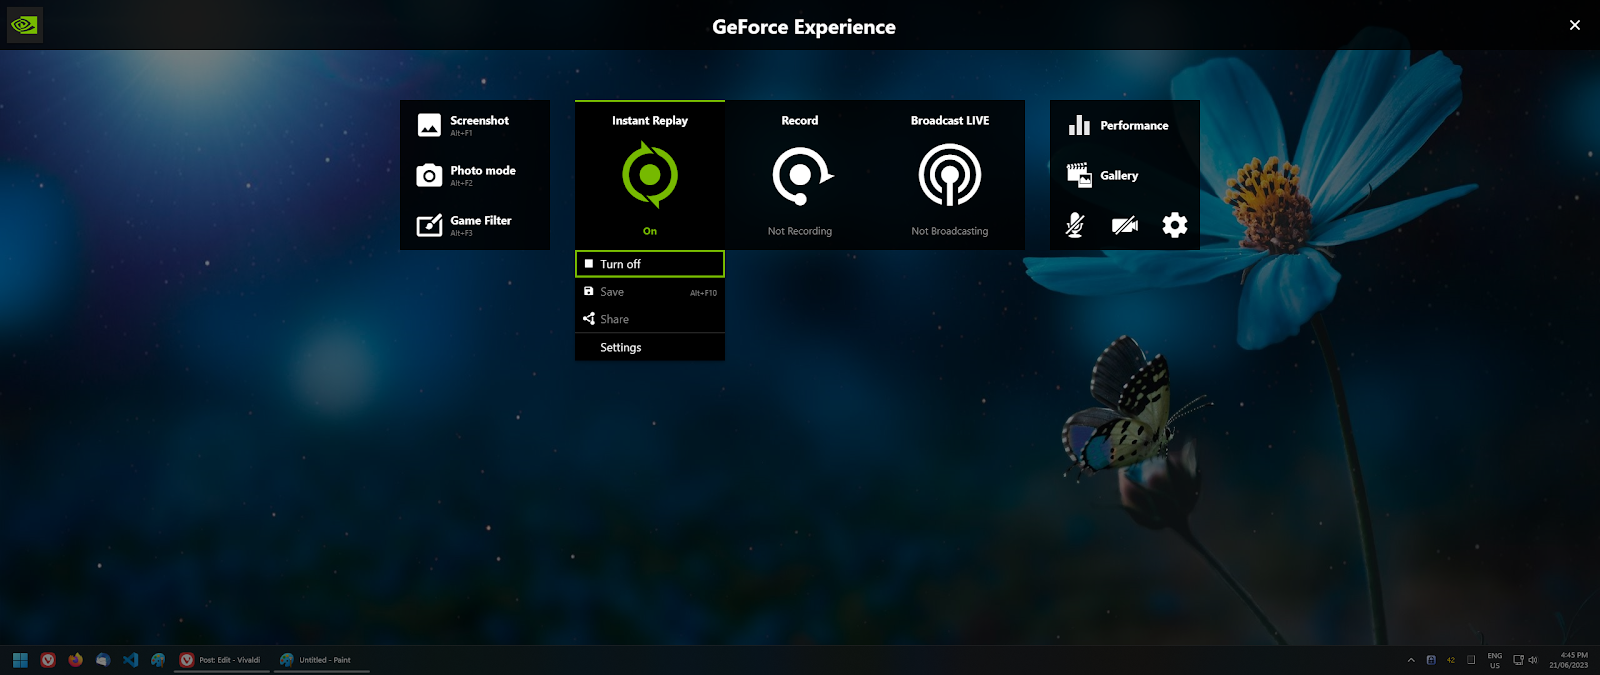
Windows / Nvidia: How to reduce GPU usage for Instant Replay when idling on desktop (without disabling it for games)


The other day I was glancing at Task Manager and noticed something annoying...

For some odd reason, the GPU was busy at around 40% capacity while I wasn't really doing much on the desktop.


After a bit of sleuthing, it turns out the "Instant replay" feature is constantly recording and encoding in the background, which is a pretty cool feature for gaming but a waste of power for my day to day usage.

While the easy option is to turn off Instant Replay altogether, I still want it on while I play games.

Fortunately there is an easy way to achieve that, but unfortunately its not obvious how.

1. Turn off Instant Replay (and watch your GPU usage drop to 0%)


2. Turn off desktop recording by going to

  • Settings (Cog)
  • Scroll down to Privacy control
  • Untick "Desktop Capture"


3. Back out and "Done" until you see the main UI

4. Turn Instant Replay back on and enjoy the 0% usage while idling on desktop


Remove URLs next to links when printing from browsers like Firefx

Sometimes you need get something done quick like printing a receipt off a webpage, but the browser just vomits URLs all over your print preview.

I've yet to figure out why this happens, but some sites will go the extra mile to make your life difficult.


What you see:


What you didn't expect:


Now to get rid of the extra URLs, paste the following into the browser Javascript console. Try pressing F12 to make it appear. If it doesn't, then how you get to that console depends on the browser and operating system you're using. A quick Google search should get you the answer.

el = document.createElement('style');

el.setAttribute('type', 'text/css');

el.textContent = `@media print {

    a[href]:after {

        content: none !important;

    }

}`;

document.head.append(el);


What you'll get:


Source

Typescript: Preventing generic string keyed objects from overlapping with Arrays

 This was a bit of a doozy and took me the better half of a day to find a semi decent fix for it.

Here's the unsuspecting use case and why it caused problems (try it out on Typescript playground)

  • SingleConfig and MultiConfig are different types. One is a single object value, the other is an array of that.
  • conditionalReturn() returns either one of those depending on the input.
  • onlyWorksWithSingleConfig() as the name states will only work with an instance of SingleConfig
  • Typescript doesn't seem to detect an issue when using onlyWorksWithSingleConfig() with the result from conditionalReturn()

Why? Because Javascript is a hot mess when Arrays are considered to be objects. It is possible that Typescript allows that behaviour because Javascript arrays are keyed by strings (not numbers) so it will fit the type interface specified by SingleConfig.

For instance, look at this output.


So now that we have a possible reason why this is allowed in Typescript, how can we prevent it?

Attempt 1 - use type guards

As documented here, I tried using them to enforce some sort of sanity. It did not work.

Attempt 2 - disallow [index: number] in SingleConfig

I found this on StackOverflow and thought it was an elegant solution to the problem, however quickly realised it broke a valid use case where this syntax would be marked as incorrect.


Attempt 3 - Disallow "random array prototype member" ✔

A smart fellow at work suggested being a bit more specific with the "never" clause.

Instead of trying to capture all the cases, why not filter out a specific case, like "length"? (Just to be safe, I used something a bit more weird like "lastIndexOf" to avoid potential issues)

And it worked! Just like that, Typescript is now correctly detecting the two separate types.


It even fixed up the type guard function isSingleType() !

Android: How to disable Chrome's useless share menu (aka the "Chrome Sharing Hub")

Note: this flag should also work on Chrome derived browsers such as Brave and Vivaldi.


It's frustrating when a company like Google tries to be all user-friendly up in your face by adding extra steps to what used to be a simple workflow.

Before:

  • Click share button
  • Choose app to share to
After:
  • Click share button
  • Scroll through horizontal list of apps (which has no visual clue to indicate that you can scroll)
  • Click on "More ..."
  • Find the app you want to share to

 I know it isn't that much but its a chore, so lets kill it.


This fucken thign right here.

Steps to disable

  • Open a new tab
  • Go to chrome://flags/#chrome-sharing-hub
  • Double check you're looking at "Chrome Sharing Hub"
  • Click on "default" for that setting
  • Change it to "disabled"
  • I also changed the setting for "Chrome Sharing Hub V1.5" but not sure if its needed

Source

Android: How to figure out which key store your app was signed with

It's been more than a few years since I've signed an APK for release and over time I've forgotten which key store I used to sign apps.

Fortunately, if you've got Java installed then you already have everything required to verify this information.

Step 1 - Acquire the APK(s)

Grab the APK file off Google Play Console (it's in "App Bundle Explorer" > "Downloads").

If its a publically published app then you could probably try grabbing it from a 3rd party APK host as well, but be wary that some dodgy ones may resign your APK.

Step 2 - Get the certificate fingerprints from your key store

Using command prompt, go to the "bin" folder in your Java install path. For me, it was at:
cd "C:\Program Files (x86)\Java\jre1.8.0_251\bin"

 Use "keytool" to read the key store information:

keytool -list -keystore "C:\Coding\Android\keystore"

It should print out a bunch of info, but the line you're interested in here is the bit after:

Certificate fingerprint (SHA1): ...

Take note of that information somewhere along with the key store filename.

Step 3 - Determining the APK certificate fingerprint

From the APK file, open it with an archive utility like 7-zip. If you can't figure out how, just rename it from "whatever.apk" to "whatever.zip".

Extract "META-INF\CERT.RSA".

Reusing your command prompt terminal from before, staying in the same path and run keytool again but with a different set of arguments:
keytool -printcert -file "C:\Users\twig\Desktop\whatever\META-INF\CERT.RSA"

Enter in the password if needed.

This will again spit out a bunch of information. The bit you're interested in is the SHA1 line under "Certificate fingerprints

Certificate fingerprints:

         MD5:  ...

         SHA1: ...

         SHA256: ...

Remember, a key store may contain multiple entries! This means there could be multiple certificate fingerprints.

By verifying the SHA1 fingerprints in the APK and the key store, you should now have enough information to figure out which key store entry was used to sign the APK.

Good luck!


Sources

 
Copyright © Twig's Tech Tips
Theme by BloggerThemes & TopWPThemes Sponsored by iBlogtoBlog