Showing posts with label python. Show all posts

Getting Python 3.6 build tools working on Windows

What an annoying process this has become. Used to be "download this exe, install and carry on".

Didn't bother with Python 3.7 since a lot of libraries were breaking on Linux.

Downloads

Grab Microsoft Visual C++ 14.0 standalone: Build Tools for Visual Studio 2017 (x86, x64, ARM, ARM64).

Setup

  • Run vs_buildtools.exe
  • Wait for it to download a bunch of files for "Visual Studio Installer"
  • Click "Individual components"
  • Select "Compilers, build tools, and runtimes" > "VC++ 2017 version 15.7 v14.14 latest v141 tools" (or whatever is latest)
  • Select "Development activities" > "Visual C++ Build Tools core features"
  • Select "Windows  10 SDK (10.0.17134.0)"
  • Everything else needed will be automatically selected for you.
  • Last chance to change "Installation location" at the bottom
  • Go grab a coffee or tea.

All up it should take about 3.03gb in space.

image

Summary on the side should look something like this

Source

Python: comparison of pipenv vs pip-tools

Now this isn't a blog I would have normally written up here since the stats in this post were only meant for my colleagues in an internal email update.

But I noticed some emotional messages in recent discussions regarding pipenv and a distinct lack of solid information about it's actual merits / benefit as a tool.

To me software development should be factual, much like maths and science. You prove yourself through your work. I don't give a shit if it was written by someone who is LGBT, has an illness or celebrity status.

It's as irrelevant to me as the stupid royal wedding. It doesn't matter and I don't need to know the back story.

That said, stress and anxiety from work should be dealt with by taking a damn break. It's not healthy to do nothing but coding or provide support for open source projects.

tldr; While I appreciate the effort and intention of the project to fix the Python workspace, pipenv feels like an early project still trying to find its feet.

Deterministic builds ARE important

As developers, there are plenty of things we'd like to spend our time doing and our dev tools are meant to help us save time in doing so.

Last week I had time to pick up a task from mid 2017 to switch our company codebase to use pip-tools.

pip-tools is primarily a tool to pin python dependencies by generating (and documenting) requirements.txt files from an input file, allowing for deterministic builds across all machines. It's pretty much yarn for Python.

I switched over to pip-tools within a day but there were still a few kinks with our dependencies. Conflicting library dependency versions, badly named libs, etc. Nothing really unexpected after 5+ years of digital hoarding and virtualenv neglect.

Another day of cleansing saw a few unnecessary libraries removed from the codebase and a neatly generated requirements.txt file.

During the process of updating our dev setup guide, I was looking for some documentation on Python.org and saw a little note recommending use of Pipenv for our virtualenv and packaging needs.

Well if it's recommended by Python it should be good, right? If this is the way it should be then it'd be in the best interest of our devs to switch to Pipenv so our skillset doesn't fall behind.

A summary of my experience follows below.

Benchmark setup

For the sake of reproducibility, all tests were done in a VM with a fresh install of Ubuntu 16.04 (on a host with a 7200rpm HDD), 4gb of ram, a shitty AMD A10-5800k and standard rubbish Aussie ADSL "broadband" internet.

Library versions are:

  • Pip 10.0.1
  • Python 2.7.11
  • pipenv 2018.5.18 (seriously, what is semver?)
  • virtualenv 16.0.0
  • and pip-tools 2.0.2

Timing was done via the "time" command. It's accessible and easy to use. Results were measured in seconds.

Notes:

  • for tests without pip cache, I would run "rm -rf ~/.cache/pip*" to clear pip/pipenv caching.
  • I wasn't able to time 2 commands properly, so I just wrote a "compile-sync.sh" script to time both "pip-compile --verbose" and "pip-sync"
  • excuse the charts, took me forever to figure out how to do them in Excel

Benchmark results

image

image

  • pipenv: pipenv --two
  • virtualenvwrapper: mkvirtualenv pt

No issue here. Nobody is gonna complain about 1 second difference in the grand scheme of things.

image

image

  • pipenv: pipenv install requests==2.18.4 django==1.11.13
  • pip-tools: ./compile-sync.sh

4 seconds difference, still not too bad.

image

image

  • pipenv: pipenv install requests==2.18.4 django==1.11.13
  • pip-tools: ./compile-sync.sh

So here was the first time I deleted the virtualenvs. I kept pip/pipenv caches intact to compare the dependency walking times.

Both much faster, but surprisingly still a 4 second difference.
image

image

  • pipenv: pipenv install (includes time to generate new lockfile)
  • pip-tools: ./compile-sync.sh

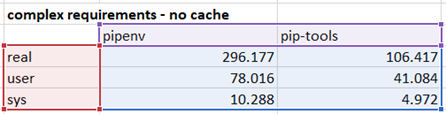
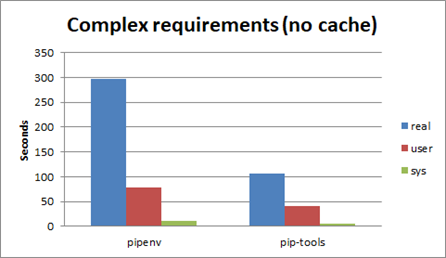
Now this is where it becomes interesting.

New virtualenv, no pip/pipenv caching, complicated requirements (pyrax and all of its insanity)

All things being equal, pipenv ends up being 2.7x slower than pip-tools.

If you want to replicate it, this is what the Pipfile looks like:

requests = "==2.18.4"
django = "==1.11.13"
### because pyrax is a cruel mistress
# "Could not find a version that matches pbr!=2.1.0,<2.0,>=1.6,>=2.0.0"
# https://github.com/rackspace/pyrax/issues/623
pyrax = "==1.9.8"
# required to get pyrax working without conflicting with its own dependencies
# https://github.com/pycontribs/pyrax/issues/623#issuecomment-329647249
"oslo.serialization" = "==1.6.0"
"oslo.utils" = "==2.0.0"
"oslo.i18n" = "==1.7.0"
debtcollector = "==0.5.0"
python-keystoneclient = "==1.6.0"
"oslo.config" = "==1.12.0"
stevedore = "==1.5.0"

For an insight to how truly horrible this library is, you should check the output of "pipenv graph".

image

image

  • pipenv: pipenv install
  • pip-tools: ./compile-sync.sh

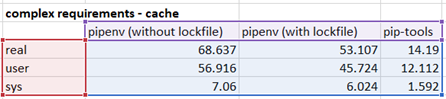
Same complex requirements as before, but this time I only binned the virtualenv. It's much quicker once the libraries are cached, but pipenv is 4.8x slower when it needs to regenerate the lockfile.

Even with a valid lockfile, it's still 3.7x slower than pip-tools.

image

image

  • pipenv: pipenv install search_google==1.2.1
  • pip-tools: ./compile-sync.sh (after manually editing requirements.in)

Waiting 1m11s each time I want to add a library does not sound appealing.

Pros and cons

At this point I've only provided speed comparisons between pipenv and pip-tools. Below are a few things I noticed during my week comparing these tools.

virtualenvwrapper

  • simple virtualenv workflow
  • have to manually modify .bashrc to get the commands working
  • would have preferred the syntax to be some variance of "venvwrap mk|rm venv_name" rather than "mkvirtualenv venv_name" and "rmvirtualenv venv_name"

pip-tools

  • simple and focused
  • works with projects AND libraries
  • maintains compatibility with existing deployment tools (puppet, ansible, etc)
  • generated requirements.txt file is well documented and easy to read
  • pip-sync both installs new and removes unused libraries
  • unable to understand urls from github with #egg==version format (which pip understands)
  • likewise with virtualenvwrapper syntax, would have preferred "piptools sync|compile" over "pip-sync" and "pip-compile"

pipenv

  • provides many useful features like "check" for security vulnerabilities and "graph"
  • graph output is very nicely laid out
  • gets the "pipenv install|sync|clean" syntax right
  • much slower at tasks
  • works with projects, but not libraries
  • documentation for commands need work, better luck with trial and error
  • pipenv sync only seems to add libraries - need to run pipenv clean to remove unused libs
  • Pipfile syntax errors result in vague TomlDecodeError stack trace instead of helpful error messages
  • may cause issues with some shell setups due to the way pipenv shell works (lose aliases, no virtualenv label shown, source commands in .bashrc no longer work as expected, etc). mitigated by using --fancy flag, but inconsistent between dev machines with varied setups
  • "pipenv run" fails to set VIRTUAL_ENV environment. Apparently this is virtualenv's fault, but isn't pipenv meant to be a tool that makes it easier for Python newbies to pick up?

"Pipenv is primarily meant to provide users and developers of applications with an easy method to setup a working environment" (from homepage, paragraph 3)

  • doesn't quite feel like deployment tooling/plugins are ready yet (puppet, ansible, etc) - requires more work to update deployment scripts
  • no command for checking if virtualenv already created (I could be wrong due to documentation)

So in a deployment script, I tried to detect if a virtualenv folder exists before trying to sync. Nope, can't do.

"pipenv --venv" should give you the path of the virtualenv, but only if the virtualenv exists. Otherwise, it ends with exit code 1 which will terminate deploy scripts

Maybe sync will work? "pipenv sync --help" shows:

Options:
  --three / --two  Use Python 3/2 when creating virtualenv.

Ahh "when creating", that sounds promising!

But alas, in practice that actually destroys and recreates your virtualenv without warning! Enjoy your additional waiting time...

:~/src/test-piptools$ pipenv sync --two
Virtualenv already exists!
Removing existing virtualenv…
Creating a virtualenv for this project…

I have no words ...

What's the verdict?

I spent roughly 4-5 days getting things to work with pipenv. A bit of time learning the ropes of pipenv's workflow, some of it fighting my mostly-vanilla bash shell to work properly with pipenv, looking up issues on Github/StackOverflow, a lot of time waiting for lockfile generation and I finally had enough when the deployment scripts/tooling needed more work in the staging environment.

Your experience with pipenv on github may vary depending on who you interact with on the contributors team. I've seen a few valid tickets get dismissed, but the friendly assistance I got from uranusjr was highly appreciated.

While I can't argue the fact that pipenv works, it's definitely one of those things that could test the patience of a saint once used in a real world environment.

I find it difficult to see why pipenv is recommended by Python.org / PYPA apart from the reason that it's made by the guy who made requests.

Something to keep an eye on, but for now I don't believe it is as production ready as their alternatives.

Update Your FreeDNS.afraid.org Dynamic DNS and specify IP Address

When running behind proxies or VPNs, the Dynamic DNS auto-updater in your router or computer isn't always able to detect the correct IP address upon update.

This will cause the dynamic DNS to point to addresses which won't route the data request back to the right IP

In order to remedy this, I've created a little Python script which fetches the correct WAN IP from the router and updates FreeDNS with the right IP.

Where can you find your token? Visit the Dynamic DNS page and copy the link for "Direct URL".

Once that's all done, just find a good time to run the script. I find that running it upon startup works well for me.

Source

Python: A warning when using the XKCD password generator

If you're not familiar with the problem yet, have a look at the comic below.

Come along redacted's XKCD-password-generator which turns this into a Python-module reality for us to easily plug into our code.

pip install xkcdpass

And in your code:

from xkcdpass import xkcd_password

wordfile = xkcd_password.locate_wordfile()
mywords = xkcd_password.generate_wordlist(wordfile=wordfile)
random_password = xkcd_password.generate_xkcdpassword(mywords, n_words = 3, delim='.')

This is all fine and very easy to use. However, there is a small catch.

priest.fucking.choirboy

Believe it or not, this is a combination that is possible with the default dictionary.

By using the default password file supplied by 12Dicts in the function locate_wordfile(), you are potentially including swear words and religious references. The potential mix of these and regular words CAN be offensive, especially when you're automatically generating these for users and sending them out blindly.

Depending on how this code is used, the recent events at Charlie Hebdo's office in Paris is a good motivation to make sure watch your words.

belldem 
When random words suddenly have meaning...

Here's one I prepared earlier

I spent about 2 days scanning the file for potentially offensive words. I've taken out as many words as I could relating to the following categories:

  • religion
  • swearing
  • sex and sexual connotations
  • drugs
  • health and/or disease related words
  • violence
  • names of people or countries

Since it was a horribly mundane task, I'm sure I've missed some. If you find some, please let me know by leaving a comment below.

For those inclined to download and run, you can grab a cleansed password file from github.

Then fix the code to use your own file:

from xkcdpass import xkcd_password

wordfile = "users/passwords.txt" # Previously xkcd_password.locate_wordfile()
mywords = xkcd_password.generate_wordlist(wordfile=wordfile)
random_password = xkcd_password.generate_xkcdpassword(mywords, n_words = 3, delim='.')

I've provided a patch/diff file for the words I've removed.

Sources

Python: Visualise your class hierarchy in UML

Sometimes it's handy to graph out the way your classes are arranged, either for training purposes or simply to help you plan your next move.

There's always the option of doing it manually, or you can use some handy tools to do so.

To get the ball rolling, grab pylint and graphviz

sudo apt-get install graphviz libgraphviz-dev python-dev
pip install pylint pygraphviz

If you don't have python-dev installed, you'll run into the error below:

pygraphviz/graphviz_wrap.c:124:20: fatal error: Python.h: No such file or directory
#include <Python.h>

Now back in your project folder, type:

pyreverse -my -A -o png -p test **/classes.py

Replace "classes.py" with "**.py" if you want all python files.

Another example is if you wanted to graph all the form classes:

pyreverse -my -A -o png -p test **/forms.py

Once it's done, you'll now have classes_test.png and packages_test.png in the folder. The packages image allows you to determine if your code modules are properly decoupled. The classes files shows you how twisted your class inheritance may be.

classes_test

Django models

For Django specific projects, you can install a module called "django_extensions". It also uses graphviz to generate some cool charts but is very Django friendly so you don't have to manually remove Meta classes from your models.

The syntax for graphing models is:

python manage.py graph_models -g -e -l dot -o my_project.png module_a module_b module_c
  • -g groups the models into their respective apps for easier viewing
  • -e shows the inheritance arrows
  • -l uses the "dot" rendering layout by GraphViz (possible values are: twopi, gvcolor, wc, ccomps, tred, sccmap, fdp, circo, neato, acyclic, nop, gvpr, dot, sfdp. I found dot to be the only legible one, and most of them didn't work for me)
  • "-o my_project.png" is the output file
  • module_x includes all the modules which you want to draw

directory_listing

Python: Reading EXIF and IPTC tags from JPG/TIFF image files

Wow this was a bit of an "antigravity" moment for me (XKCD #353).

All I really needed to do was choose my poison:

  • Pillow (an actively maintained PIL fork which unofficially supports basic EXIF tag reading)
  • ExifRead (EXIF reader) v1.4.2 at time of writing
  • IPTCInfo (IPTC reader) v1.9.5-6 at time of writing

Notes

I'd just like to point out some things I learned the hard way.

  • If something isn't showing up in the EXIF tag data, then it's most likely saved as IPTC metadata (like title, subject and tags/comments in the screenshot below).
  • The fields XPTitle, XPComment, XPAuthor, XPKeywords and XPSubject are encoded in UCS2 (UTF-16). This will need to be converted, unless you like dealing with hex strings or byte arrays.
  • Combining an EXIF and IPTC method together will be your best way of extracting metadata from the file.


image

Using Pillow

This one reads some of the basic EXIF data but tended to be a bit clunky to use.

Helper function:

And to use it, simply pass in the values from Image._getexif(). The helper function convert_exif_to_dict() will make it easier for you to read information off, rather than referring to data by ID.

Would I recommend it? Probably not. ExifRead below is a much better candidate.

Using ExifRead

This alternative to using PIL can extract much more information and also makes it easier to fetch information, but it also does require you to install another library.

As you can see, this one is much cleaner to use, except for the weird problem where you have to access exif['something'].values instead of exif['something'].

It's not gonna ruin your day, but I guess you could write a helper function for it if it really bothered you.

There's also another bit in the snippet where I use join/map/unichr. That's because the values for those fields need to be converted from an array of bytes to a string which Python can understand.

Using IPTCInfo

Lastly there's IPTC, which I've NEVER heard of until I started trying to pull metadata from JPG/TIFF files. This was my antigravity moment where I just looked for a library, installed it and "it just works".

Sadly, it feels a little bit like a Java developer wrote it. Mainly because of little things like iptc.getData() where you can just use iptc.data.

You'll also feel a little lost without knowing which data keys to use, so can get a list of all the possible data key names by examining:

from iptcinfo import c_datasets, c_datasets_r

Those two dictionary objects will tell you what's available so it shouldn't be too hard to write a nice little wrapper for it. These kinda feel like Java enums =\

GZUKvFD
Are you ready to handle all this big data?

Sources

Python 2: Converting bytes array to String

This handy little snippet lets you convert an array of bytes to a string.

u"".join(map(unichr, bytesArray))

If you know you're working with ASCII, you can replace unichr with chr.

Once you got the string, you'll have to determine if decoding the string is necessary. You'll kinda have to know/guess the input encoding before you can convert it properly for 100% coverage.

ib0eHYkMkfmJjH
Enjoy!

Eclipse: Hide pyc files from Open Resource Window

Something that's been bothering me for some time now is the fact pyc files appear in Eclipse's "Open Resource" popup when using PyDev.

image

Although they don't show in the project explorer, there's absolutely no reason for them to appear in the resource popup. So, in order to remove them you'll have to:

  • Right click on your project (it seems you only have to do this once)
  • Click Properties
  • Go to Resource > Resource Filters
  • Click "Add"
  • Filter type: Exclude all
  • Applies to: Files
  • Click "All children (recursive)"
  • File and folder attributes: Name matches *.pyc
  • OK to apply and save thoroughly


image
Your settings should look a little something like this.

Although I've only done this once, it seems that it applies to all my projects. Could be wrong, but I don't remember having to do it for all my projects.

Source

Python & Google Analytics v3: Using google-api-python-client to access Analytics via the API

First up, I don't know what the fuck Google was doing with the docs when this was rolled out. Anything involving OAuth2 is horribly documented, requiring you to trawl through hundreds of pages for a few key lines of information.

Python's gData library is very nice, don't get me wrong. However it seems to be using Analytics v2 and the main issue I had with v2 was the rate limit which was constantly being reached. With v3, the limit was dramatically increased but you're constantly being told to go through the unecessary way of implementing OAuth2.

Well when I finally sledged my way through Google's crazy maze of doc pages, a mixture of obsolete StackOverflow posts and people giving advice for the "user authenticated" way of doing things, I finally came up with a working example to share.

A3DC24F9D84566735B5DA2B2423577
Yes Google, I really enjoyed reading all those pages of writing to get what it working...

API Setup - Google Cloud Console

Google has taken a great amount of effort to centralise all the configuration for their APIs into this one central hub, Google Cloud Console.

In order to get Analytics API working, you'll need a "project".

  • Create a project (with any name and Project ID) and click on it.
  • Click on "APIs & Auth"
  • Enable "Analytics API". Make sure the status is green and says "ON"
  • Click on "Analytics API"
  • "Quota" is where you set your rate limit (I set mine to 10 requests per second because of the regex 128 character limit when filtering).
  • "Reports" is where you can check your usage for the day. You can have up to 50,000 requests a day.

Now click on "Registered apps" under "APIs & auth".

  • Register a new app (or use existing one)
  • Name can be whatever you want, but it should be a "Web Application"
  • When you see a screen with 4 options, click on "Certificate"

image

  • Click "Generate certificate"
  • Download and save the private key file to a safe place. You'll need this to access the API from within your code.
  • Copy the generated "Email Address" to your code somewhere. It should end with "@developer.gserviceaccount.com". This is the important bit.

The email address is your "Service Account". This is not made clear to you in many of the doc pages!

Now we should be done with the Google Cloud Console.

API Setup - Analytics & how to get a table ID

Log into your Analytics admin and edit your tracker. Add in your service account email into the list of users which can view & analyse your data. You need to do this for every tracker the account needs to access.

While you're still in Google Analytics, you will need to find the unique "table ID". This simply refers to each site you have in the account.

This is what the docs describes the table ID as...

The unique table ID of the form ga:XXXX, where XXXX is the Analytics view (profile) ID for which the query will retrieve the data.

The unique ID used to retrieve the Analytics data. This ID is the concatenation of the namespace ga: with the Analytics view (profile) ID. You can retrieve the view (profile) ID by using the analytics.management.profiles.list method, which provides the id in the View (Profile) resource in the Google Analytics Management API.

Not very useful! Link is useless too.

How you get the table ID is relatively simple. There's no need to write code or put your data into a 3rd party site either.

Take for example my (now defunct) "DCX GoogleCode page" tracker.

image

The table ID is NOT the field starting with "UA-..."! Instead, right click on the last item in the list and copy the link location.

The current link has a format like this: https://www.google.com/analytics/web/?hl=en#report/visitors-overview/a11111111w22222222p33333333/

Your table ID sits in the position where "33333333" is after the character "p". Copy that to your code somewhere.

Setting up Python

You'll need to install these libraries. You can use pip or easy_install, or manually. Whichever you prefer, just make sure you install it right. I've specified the versions I used at time of writing in case anybody needs it.

  • google-api-python-client (v1.2)
  • pyOpenSSL (OAuth installs an older version v0.1, but I had to upgrade to v0.13.1)

Code Snippet

This code will help you initialise the connection to the Analytics API v3 service.

import httplib2

from apiclient.discovery import build
from oauth2client.client import SignedJwtAssertionCredentials

def connect_to_analytics(self):
f = file('googleanalytics/your-privatekey.p12', 'rb')
key = f.read()
f.close()
credentials = SignedJwtAssertionCredentials(
'your@developer.gserviceaccount.com',
key,
scope='https://www.googleapis.com/auth/analytics.readonly')

http = httplib2.Http()
http = credentials.authorize(http)

return build('analytics', 'v3', http=http)

As you can see, there's no:

  • secret client tokens
  • "flows"
  • Getting an authorisation URL and storing temporarily credentials
  • "Storage" methods
  • web authentication back and forth bullcrap to deal with

This example can be tweaked in any way you want, just read through to see the important bits for you. I've included an exponential backoff for your convenience in case you hit the rate limit.

def fetch_data():
# Exponential backoff
# https://developers.google.com/analytics/devguides/reporting/core/v3/coreErrors#backoff
n = 1
service = connect_to_analytics()

while True: # Retry loop
try:
# See this URL for a full list of possible dimensions and metrics
# https://developers.google.com/analytics/devguides/reporting/core/dimsmets
arguments = {
'ids': 'ga:123456', # Your Google Analytics table ID goes here

'dimensions': 'ga:pagePath',
'metrics': 'ga:pageviews',
'sort': '-ga:pageviews',

'filters': 'ga:pagePath=~%s' % path_pattern, # Regex filter
'start_date': start_date.strftime("%Y-%m-%d"),
'end_date': end_date.strftime("%Y-%m-%d"),
'max_results' : 1000, # Max of 10,000
}

data_query = service.data().ga().get(**arguments)
feed = data_query.execute()

# Reset retry counter
if n > 0:
n = 0

break # Break free of while True

except HttpError, error:
print error.__class__, unicode(error)

if error.resp.reason in ['userRateLimitExceeded', 'quotaExceeded']:
sec = (2 ** n) + random.random()
print "Rate limit exceeded, retrying in %ss" % sec
time.sleep(sec)
n += 1
else:
raise

if 'rows' not in feed:
print "No results found"
return

data = {}

for row in feed['rows']:
pagePath, pageviews = row

# TODO: Do your stuff here
# example: data[pagePath] = data.get(pagePath, 0) + int(pageViews)

return data

The important bits are setting the right arguments and these two lines:

data_query = service.data().ga().get(**arguments)
feed = data_query.execute()

Just in case

If at any time you see this error, you'll need to upgrade pyOpenSSL:

  File "/usr/local/lib/python2.7/dist-packages/google_api_python_client-1.2.egg/oauth2client/crypt.py", line 106, in sign
    return crypto.sign(self._key, message, 'sha256')
AttributeError: 'module' object has no attribute 'sign'

A little post-coding activity

Please take the time to give Google a big kick in it's ass. Not everybody is drinking the Google-aid so tell them which part of the docs need more explaining. There's a lot of assumed knowledge in there which makes it difficult for people to pick things up.

UDC6yPN
Take THIS shitty Google documentation!

Sources

Not very useful

Useful once you're connected to the API.

This pointed me to the right search term, "Service Accounts"

Finally, the holy grail.

Python: Print XML element to string

Just a little snippet that I used before but had trouble finding.

from xml.etree import ElementTree

ElementTree.tostring(xml_root_or_element)

Python/Twitter: Posting tweets (with images)

There are a few services out there that'll post your RSS feed to multiple societ networks, but sometimes you want that little extra configurability which just won't happen unless you do it yourself.

There are a few ways of skinning this cat, but today I'll only be writing up about the easiest one.

What you'll need

  • Twython (v3.0.0 at time of writing)
  • A Twitter account (API v1.1 at time of writing)

Download and install Twython from the site or via "pip install twython".

Setting up twitter

What you'll need for this to work is a twitter "app" associated with your account. For the purpose of this tutorial, I'll show you how to set up your own account with your own app for testing purposes.

  • Hit up https://dev.twitter.com and sign in with your twitter account.
  • Go to "My Applications" (via top/right dropdown menu where your account image is).
  • Create a new app by entering the name, description, website
  • Go to "Settings" and see "Application Type"
  • Change it to "read and write" and save.
  • Back in the "Details" tab, click on "Create my access token" (it may take a few minutes so periodically refresh the page and until your access token appears)
  • Click on the "OAuth tool" tab to make sure it's all filled in
  • Copy all 4 values (Consumer and Access token key/secret) somewhere because you'll be needing them soon.

Looking at your normal twitter page, check out https://twitter.com/settings/applications and it should list your app with "Permissions: read and write".

Now that's twitter done.

Python setup

Now for the fun bits, coding!

Just a tweet:

import twython

twitter = twython.Twython(
"CONSUMER_KEY",
"CONSUMER_SECRET",
"ACCESS_TOKEN",
"ACCESS_TOKEN_SECRET"
)

# Tweeting textually
twitter.update_status(status = "Testing tweet from Twig's Tech Tips")

And a tweet containing images:

# Update with image
# f = open("weather_sunny.png", 'rb')
# or
# f = urlopen("http://www.weather.com/sunny.jpg")

twitter.update_status_with_media(
status = "Testing tweet from Twig's Tech Tips... with imagery!",
media = f
)

There you have it, consider your cat is now skinned.

FUR-ITS-MURDER-e1297066919608

This setup can also be used for stuff like fetching/searching tweets using the twitter API, but just read the docs to find examples of that. Just be aware of the limitations which the twitter API impose before conjuring anything on a grand scale.

Sources

Python: Setting up easy_install on Windows

This was much easier than expected, especially without the hassle of installing Cygwin!

First of all, grab ez_setup.py from the setuptools v1.1 page.

In your Python command prompt, type:

python ez_setup.py

Let it work it's magic as it installs a copy of easy_install.exe into your Python/Scripts folder.

Just make sure that folder is in the PATH variable of your shell or system environment variable.

Once you're done with that, test out the script by installing something.

Normally you can install things via:

cd pypackagename-1.0.0
python setup.py install

G0ociY7
All good? Yeaaaaaaaah, all good.

Source

Varnish: Clearing your ESI cache

After setting up Varnish ESI caching, we can clear the cache when required. The example below written in Python shows you how to purge the ESI fragments.

In the VCL file, you'll have to add this somewhere at the top of the file. I put it under the backend declarations.

# Allow PURGE requests from the following web servers
acl purge_acl {
"yourhost.com.au";
"anotherserver.com.au";
}

And under "sub vcl_recv", add:

# Allow PURGE requests from our web servers
if (req.request == "PURGE") {
if (!client.ip ~ purge_acl) {
error 405 "Not allowed";
}

return(lookup);
}

Lastly, add in:

sub vcl_hit {
# Clear the cache if a PURGE has been requested
if (req.request == "PURGE") {
set obj.ttl = 0s;
error 200 "Purged.";
}
}

Now you can send PURGE requests to Varnish. When varnish detects a purge command, it'll clear the ESI cache for the given fragment.

For the following code, you'll have to send the full URL to the site's URL. It can definitely be improved, but this should be enough for you to get started.

from urlparse import urlparse
from httplib import HTTPConnection

def esi_purge_url(url):
"""
Clears the request for the given URL.
Uses a HTTP PURGE to perform this action.
The URL is run through urlparse and must point to the
varnish instance, not the varnishadm

@param url: Complete with http://domain.com/absolute/path/
"""
url = urlparse(url)
connection = HTTPConnection(url.hostname, url.port or 80)

path_bits = []
path_bits.append(url.path or '/')

if url.query:
path_bits.append('?')
path_bits.append(url.query)

connection.request('PURGE', ''.join(path_bits), '', {'Host': url.hostname})

response = connection.getresponse()

if response.status != 200:
print 'Purge failed with status: %s' % response.status

return response

Varnish also allows some sort of regex/wildcard purging, but I haven't implemented this yet. If you need mass purging, this post point you in the right direction.

Python/Django: Dealing with UTF8 in URLs/URIs

UTF8 is a nice set of characters to use, but one must remember that the standard for URL encoding has to be in ASCII. You've probably run into it before with the Python urllib and urllib2 libraries when encoding issues are raised. These are valid exceptions!

92JJn
Yeah that's right bitch, urllib ain't taking your UTF8 shit.

"But it just works in my browser!" you may be thinking. Yes, most modern browsers will automatically convert the UTF8 URL into an ASCII request behind the scenes without showing it to you.

So as a developer, if you have a URL containing UTF8 characters then you'll have to convert it to ASCII before you can send a request.

If you're using Django, then you have some nice helper functions to deal with this. By using django.utils.encoding.iri_to_uri(), you can simply convert the UTF8 portions of the URL into ASCII and keeping everything else unmodified.

If you're not using Django... I guess you can try to incorporate their madness from their encoding module source file.

Examples

First make sure your URLs are properly encoded in Unicode (note the little "u" in front of the string when defining "url").

Take for example this URL which contains UTF8 characters. A quick test shows: http://twigstechtips.blogspot.com/seârch/labél/pythön

>>> url = 'http://twigstechtips.blogspot.com/seârch/labél/pythön'
>>> print url
# http://twigstechtips.blogspot.com/se├órch/lab├®l/pyth├Ân


>>> url = u'http://twigstechtips.blogspot.com/seârch/labél/pythön'
>>> print url
# http://twigstechtips.blogspot.com/seârch/labél/pythön

But what about GET args? Don't worry, iri_to_url() deals with them too. For example: http://twigstechtips.blogspot.com/seârch/labél/pythön?query=djångõ

>>> url = u'http://twigstechtips.blogspot.com/seârch/labél/pythön?query=djångõ'
>>> print iri_to_uri(url)
# http://twigstechtips.blogspot.com/se%C3%A2rch/lab%C3%A9l/pyth%C3%B6n?query=dj%C3%A5ng%C3%B5

And it also works for UTF8 domains too (yes, they exist!). In this instance, we'll use http://camtasia教程网.com:

>>> url = u'http://camtasia教程网.com'
>>> print url
# http://camtasia教程网.com


>>> print iri_to_uri(url)
# http://camtasia%E6%95%99%E7%A8%8B%E7%BD%91.com

I'll be honest, I'm not quite sure what the heck an IRI is but this magic function works as advertised.

39gyh1taajden89mwf8v331ug
BOOM! It just works.

On a final note, if you're after UTF8 friendly versions of urllib.quote() and urllib.quote_plus(), then there are also:

The functions django.utils.http.urlquote() and django.utils.http.urlquote_plus() are versions of Python’s standard urllib.quote() and urllib.quote_plus() that work with non-ASCII characters. (The data is converted to UTF-8 prior to encoding.)

Source

Python: lxml "Unicode strings with encoding declaration are not supported" error

ValueError: Unicode strings with encoding declaration are not supported. Please use bytes input or XML fragments without declaration.

Ran into this interesting quirk when fixing some UTF8 issues. Actually it's not really a quirk but by design, since encoding gives most people a headache.

The reason behind this is lxml just doesn't trust people to give it properly encoded strings, and rightly so.

So simply just give them the raw input or a file handle and it'll handle the encoding itself.

Don't do things like:

str = u"%s" % input
# or
str = file_content.encode("utf-8")

Things like this will work much better:

from lxml import etree
file_content = urlopen(link).read()

parser = etree.XMLParser(recover=True)
xml = etree.fromstring(file_content, parser)

# or

from StringIO import StringIO
parser = etree.XMLParser(recover=True, encoding='utf-8')
xml = etree.parse(StringIO(file_content), parser)

If the XML string already declares an encoding type then you don't need to provide any encoding. It's smart like that.

78
So kick back and relax, lxml's got this.

Source

Python: Listing files in an FTP

Well, I don't know why this had to be harder than it currently is.

ftp = ftplib.FTP(self.get_ftp_host(), username, password)
ftp.cwd("/path/to/files/")
files = list_files(ftp)
print files

def list_files(ftp_connection):
files = []

def dir_callback(line):
bits = line.split()

if ('d' not in bits[0]):
files.append(bits[-1])

ftp_connection.dir(dir_callback)
return files

yWAuj
Great success!

Sources

Python: Resize an image and keep aspect ratio

A handy little snippet that saves you a lot of work is the ability to quickly generate thumbnails from a source image.

from PIL import Image

filename = "/tmp/thumbnail_file.jpg"

# Read the image, resize and save as a temporary file
image = Image.open(input_filename)

image.thumbnail([max_width, max_height], Image.ANTIALIAS)

image.save(filename, "JPEG")

Image.ANTIALIAS option is the best for sizing down. See the docs for other resize filters.

One thing to keep in mind is that Image.resize() actually resizes the whole image to fit the given size exactly, without preserving the aspect ratio.

toddler_air_hump
Proceed to bust a move!

Source

Python: Convert datetime to date

In order to do date comparisons, you need to convert your datetime to a date object.

To do that, simply call date() from your datetime object.

now = datetime.datetime.now()
now_date = now.date()

I know, bad example because I could have used datetime.date.today() instead.

tumblr_kp591vlknj1qzxzwwo1_500
Now, if only I could handle time like Sean Connery...

Source

Python & HTML Tidy: Checking and displaying HTML errors

The system I was building allowed for entry of HTML entities, but was used by many non-HTML familiar users.

To prevent broken HTML from entering the database and potentially breaking the site layout upon display, I needed a way of indicating that the markup was broken whilst informative enough to point to where the error is.

Luckily, the HTML Tidy library for Python does just that! Depending on your operating system, you can get it via pip or easy_install with "pytidylib".

Once you're set up, doing the actual check is easy.

from tidylib import tidy_fragment
import re

# Check for missing close tags (bold, italics, links, etc)
document, errors = tidy_fragment(data)
reobj = re.compile(r"(line \d+ column \d+ - Warning: missing </\w+>)")

missing_tags = []

for match in reobj.finditer(errors):
missing_tags.append(match.group())

print missing_tags

Done and dusted!

bCcrQ
Time for a long awaited feel-good "cat pushing another cat off a shelf GIF"!

Sources

Python: How to parse XML/RSS feeds with namespaces using lxml.etree

Alright, this one had me stumped for a good hour or two.

Take for example a Flickr RSS feed.

image

Those namespaces are a pain, but it's not too bad if you can sort them out before you use them.

# Some basic setup
from urllib2 import urlopen
from lxml import etree

# Namespaces copied straight out of the feed source
namespaces = {
'media': "http://search.yahoo.com/mrss/",
'dc': "http://purl.org/dc/elements/1.1/",
'creativeCommons': "http://cyber.law.harvard.edu/rss/creativeCommonsRssModule.html",
}

# Untested fetching code, just for understanding
file = urlopen(feed_url)
xml = etree.parse(file)
item = xml.get_root().find('channel')[0]

Now here's the basic structure of an RSS feed item.

<item>
<title>For the lazy</title>
<link>http://www.flickr.com/photos/handles/7429952158/</link>
<description>blah blah blah</description>
<pubDate>Sat, 23 Jun 2012 21:59:07 -0700</pubDate>
<dc:date.Taken>2012-06-24T14:58:54-08:00</dc:date.Taken>
<author flickr:profile="http://www.flickr.com/people/handles/">Handles</author>
<guid isPermaLink="false">tag:flickr.com,2004:/photo/7429952158</guid>
<media:content url="http://farm6.staticflickr.com/5347/7429952158_962a849b30_b.jpg" type="image/jpeg" height="1024" width="768"/>
<media:title>For the lazy</media:title>
<media:thumbnail url="http://farm6.staticflickr.com/5347/7429952158_962a849b30_s.jpg" height="75" width="75" />
<media:credit role="photographer">Handles</media:credit>
</item>

To get information off those elements, you'll need some slightly different syntax.

# Now to fetch the data from the namespaced elements
media_title = item.find("{%s}title" % namespaces['media']).text

media_thumbnail = media_title = item.find("{%s}thumbnail" % namespaces['media'])
thumbnail = {
'url': media_thumbnail.get('url'),
'width': media_thumbnail.get('width'),
'height': media_thumbnail.get('height'),
}

taTtM
Problem solved, like a boss!

Source

 
Copyright © Twig's Tech Tips
Theme by BloggerThemes & TopWPThemes Sponsored by iBlogtoBlog