Fortunately, easy enough to disable.
- Open a new tab
- Type in "about:config"
- Paste "browser.urlbar.unifiedcomplete" into the filter
- Double click to toggle it to false
- Done!
If you've found one or more of my blog posts helpful, why not say thanks by buying me a coffee or beer?


Initially when I created the VM I thought would be temporary. It turned out to be not so temporary.
I thought I could just get away with using GParted and resizing the blocks around, but it turned out to be more tricky than expected.
BEFORE YOU DO ANYTHING,
MAKE A BACKUP OF YOUR VIRTUAL DRIVE!
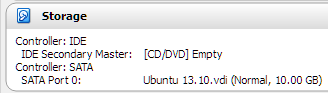
For example sake, here's my 10gb guinea pig.
In your host, you have to run some commands to increase the capacity of the drive before you can do anything with partitions.
Use a calculator to calculate how much space you want to allocate in MB.
For reference, 100GB = 1024mb * 100 = 102,400mb
In command prompt, run these commands:
This will only increase the capacity of the file itself.
You can check it in the VirtualBox VM details page, but it's not actually accessible yet.
You still have more work to do.
Lo and behold, I am now 50. Oh wait I'm not, I just look it.
I used a copy of LinuxMint and configured it for Live CD usage. This was purely because I already had the ISO on hand. If you don't, you can save yourself the wait and just grab a GParted LiveCD from their website.
Remember to test the "resized" partition before continuing!
If you're not seeing the space show up in df results, to make that space accessible to the partition you'll need to run two more commands.
The MOUNTPOINT for my VM was "/dev/mapper/ubuntu--vg-root"
First command expands the LVM while the second resizes the filesystem.
Now, are you sure that you don't have too much space?