Showing posts with label disqus. Show all posts

Easily Migrate Blogger / Blogspot comments to Disqus

It used to be a really simple process; click a button on Disqus admin, log into blogger, and then comments are migrated. But Disqus was left with a broken import link when Google deprecated some of their APIs. Given that it's been broken for a while, I didn't see that being fixed anytime soon.

So, I finally got some time to roll my own fix based off a bit of code I previously wrote. Now that it's been tested for a few weeks, I've decided to make it public.

This is a multi-step process but doesn't take more than a few minutes each to set up.

Exporting your existing comments

  • Go to your Blogger admin and then find the settings item on the left menu.
  • Under that, look for "Other settings"
  • Click "Export blog" at the top.
  • Save the backup file somewhere.

I don't blame you for having trouble finding it. Below is a screenshot of where to click.

image

Converting your comments to WXR

What you have now are comments in some God-awful XML format which you'll need to convert to Wordpress WXR format, one that Disqus can import.

You can either use my online "Blogger to Disqus comment converter" tool which uses django-disqus, or (if you don't trust me) check out the source and run it yourself.

Setting up Disqus

This part is fairly straight forward.

  • Create a Disqus forum for your site.
  • Go to the admin and then the Discussions tab
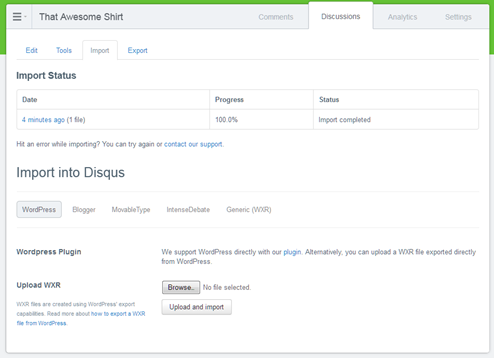
  • Click Import
  • Select the Generic tab
  • Upload the converted WXR file
  • While you wait, continue with the setup below.

Setting up Disqus on Blogger

Now that the import process has started, there's just one more thing left to do on your blog. While you wait for the import to complete, set up the Disqus plugin on your blogger so the old comments don't show anymore.

There is a page on Disqus that lets you quickly add the plugin to the site of your choice.

Click on this link and then:

  • Click the "Add <disqus forum name> to my Blogger site" button (Step 1. You can ignore step 2 because we already did that)
  • Select a blog you wish to use Disqus
  • Click "Add widget"

Supporting Internet Explorer users

For those who wish to support Internet Explorer users, there is an extra step involved.

Check the source of your blog and search for "X-UA-Compatible" and check that it's using "EDGE". If it's not there or it's not showing "EDGE", Disqus has a decent tutorial written up here on how to add it into your Blogger template.

And that's the end of that! The Disqus widget on Blogger will handle the rest.

scream

You're finally done!

Sources

Django: Export comments to Disqus WXR / XML format

With the help of the django-disqus module, it's pretty easy to export our comments out to Disqus.

First you'll need to install the module django-disqus (v0.4.3 at time of writing).

The example provided was used when I switched www.thatawesomeshirt.com over to Disqus. The class used is loosely based off the regular class used in the syndication module.

urls.py

from tas.feeds import ShirtCommentsWxrFeed

urlpatterns += patterns('',
('^export/comments/', ShirtCommentsWxrFeed()),
)

feeds.py

As you can see, this is where all the heavy lifting happens.

Once you have the output, you can import it more than once without creating duplicates. I believe duplicate detection is done using the value from comment_id().

image

In your Disqus admin:

  • Go to Discussions > Import > Generic (WXR) (using WordPress one will give you strange errors regarding the thread)
  • Upload the WXR file generated
  • Wait until it's done

I've noticed that files which are less than 10mb are processed rather quickly. Anything closer to the 50mb limit will take almost 24hrs to process.

All in all, it's probably one of the best processes for migrating comments that I've used so far.

like-a-boss_o_177339

Almost as good as this guy.

Sources

Disqus: Detect when comment count has loaded

With Django deprecating their contrib comments module, they suggested that we switched to Disqus as an alternative. It's pretty good, but I found that it was a little tricky to configure stuff on the Javascript side of things.

Sometimes we get a nice callback option to know when values have been filled in. That way we can tweak the output to suit our site if needed.

Not in the case with Disqus' count.js script. It populates any elements with a URL ending with "#disqus-thread" or the attribute "data-disqus-identifier" with the count values fetched from the Disqus server.

The only problem is we don't know when that's done, and it also fills in "0 comments" for us when we may not want it to.

The tl;dr solution

Here's the default unmodified script they tell you to paste in:

<script type="text/javascript">
var disqus_shortname = 'YOUR_SITENAME';
(function () { var s = document.createElement('script');
s.async = true;
s.type = 'text/javascript';
s.src = 'http://' + disqus_shortname + '.disqus.com/count.js';
(document.getElementsByTagName('HEAD')[0] || document.getElementsByTagName('BODY')[0]).appendChild(s);
}());
</script>

And this is what I'm telling you to paste in:

Explanation

If you haven't noticed already, the modified version uses jQuery in two places. If you don't want to use jQuery, then you should be able to port this code to any other Javascript library fairly easily.

The first place is via $.getScript(). This loads the count.js script file, executes it and then calls the callback function disqus_counts_loaded().

When the script is done with whatever it needs to do, it inserts another script called count-data.js into your page to fetch the data.

When count-data.js is loaded, DISQUSWIDGETS.displayCount() is automatically called to fill the elements full of the new luscious data.

Because we overridden displayCount() with our own function, it now fires an event afterwards to any elements wishing to know when the "disqus-counts-loaded" occurs.

Example usage

<script type="text/javascript">
$('.comments').bind('disqus-counts-loaded', function() {
var obj = $(this);

if (obj.text() == "0 Comments") {
obj.text("");
}
else if (obj.hasClass("user-review")) {
obj.text(obj.text().replace("Comments", "User reviews"));
}
});
</script>

This snippet hides anything that says "0 Comments". Why? Because it's distracting. It also changes "Comments" with "User reviews" on certain elements.

Spot the difference between the before/after screenshots.

imageimage

The layout on the right is much cleaner with  the "0 comments" clutter hidden away.

Sources

 
Copyright © Twig's Tech Tips
Theme by BloggerThemes & TopWPThemes Sponsored by iBlogtoBlog