Showing posts with label windows. Show all posts

Windows / Nvidia: How to reduce GPU usage for Instant Replay when idling on desktop (without disabling it for games)


The other day I was glancing at Task Manager and noticed something annoying...

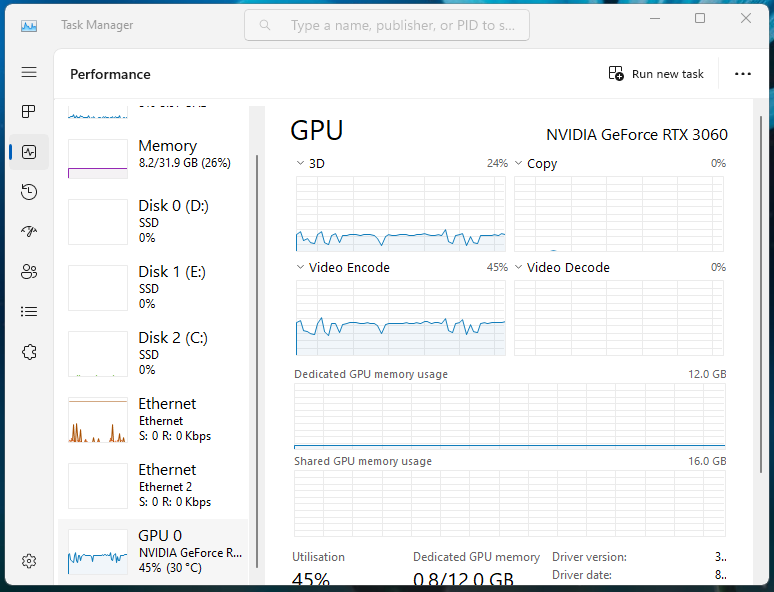
For some odd reason, the GPU was busy at around 40% capacity while I wasn't really doing much on the desktop.


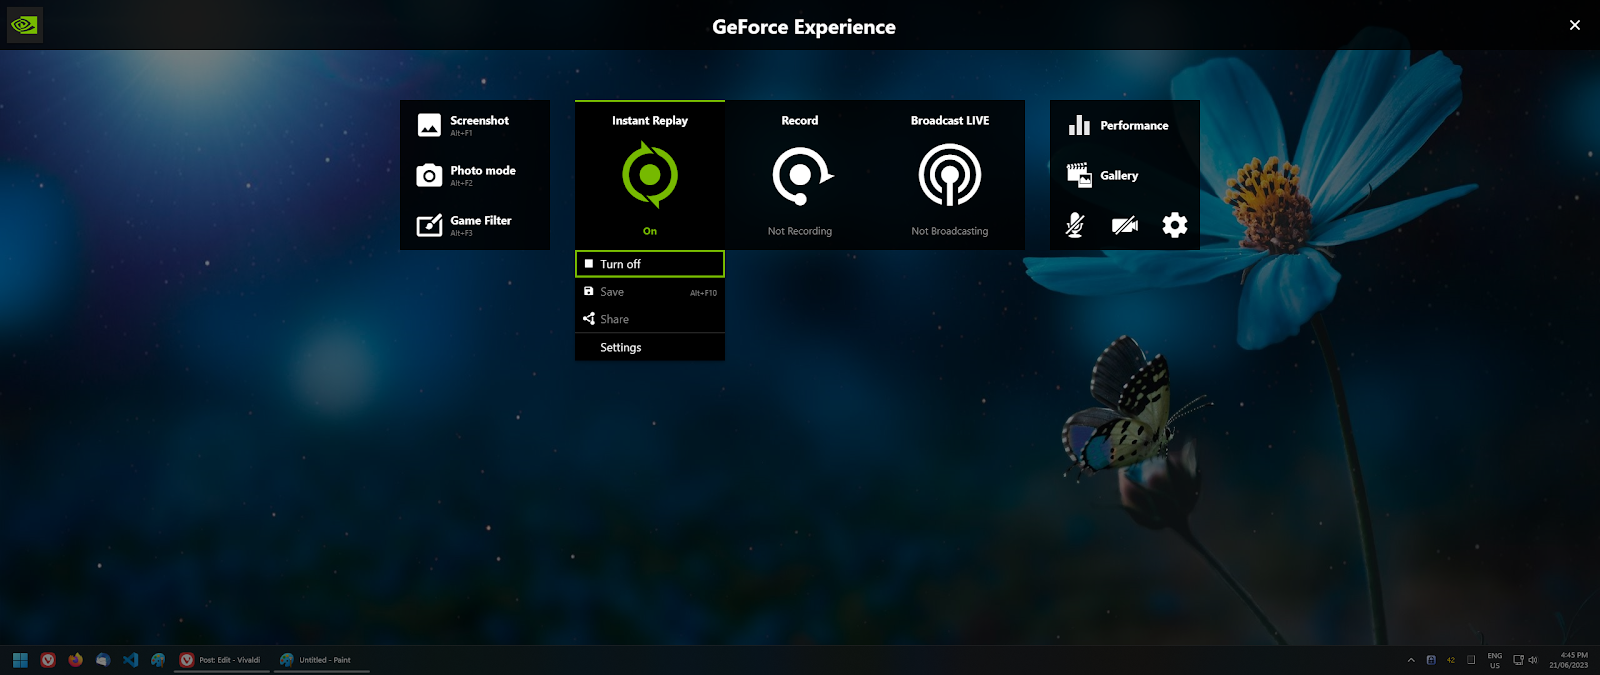
After a bit of sleuthing, it turns out the "Instant replay" feature is constantly recording and encoding in the background, which is a pretty cool feature for gaming but a waste of power for my day to day usage.

While the easy option is to turn off Instant Replay altogether, I still want it on while I play games.

Fortunately there is an easy way to achieve that, but unfortunately its not obvious how.

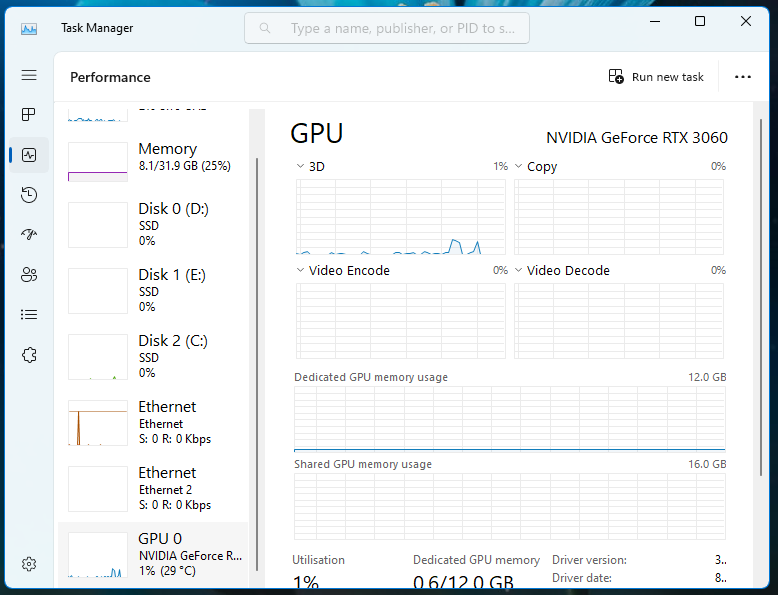
1. Turn off Instant Replay (and watch your GPU usage drop to 0%)


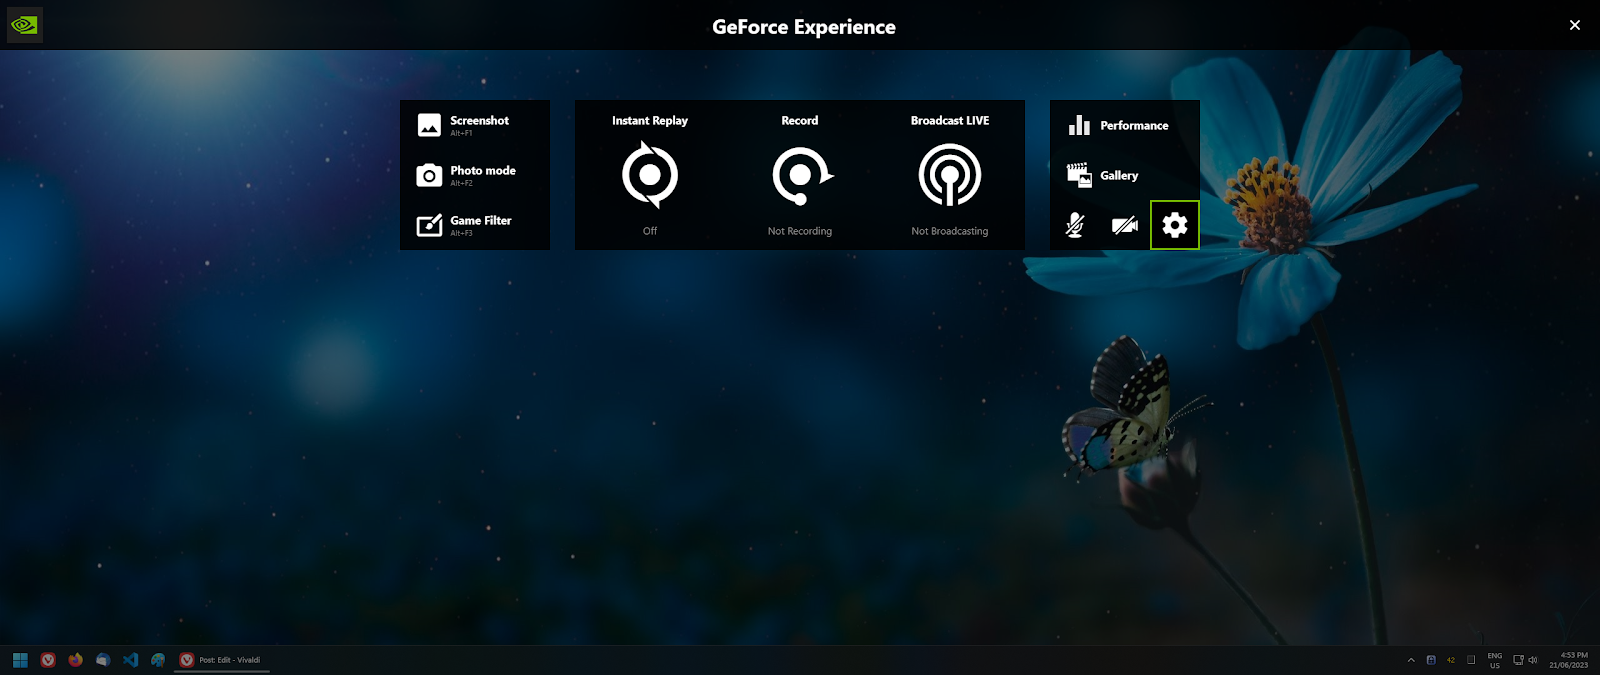
2. Turn off desktop recording by going to

  • Settings (Cog)
  • Scroll down to Privacy control
  • Untick "Desktop Capture"


3. Back out and "Done" until you see the main UI

4. Turn Instant Replay back on and enjoy the 0% usage while idling on desktop


How to get Android Studio Emulator working properly with Ryzen on Windows - actual instructions that don't suck

I recently built a new Ryzen computer and felt like getting back into Android development for some personal apps. Got Android Studio up and running without any major issues, but the emulator wouldn't run without HAXM (which doesn't work on AMD processors).


Intel HAXM is required to run this AVD. HAXM is not installed.
Install Intel HAXM for better emulation performance.
So one of the first results we all see when searching Google for "Android Studio Ryzen" is a blog post on Google's official Android developers blog titled Android Emulator - AMD Processor & Hyper-V Support, posted in July 2018.

For Windows, the instructions looked simple enough.

  1. ✔️Have an AMD Ryzen processor
  2. ✔️Android Studio v3.2 beta or higher
  3. ✔️Android Emulator v27.3.8 or higher
  4. ✔️x86 based Android Virtual Device image
  5. ✔️Windows 10 April 2018 or higher
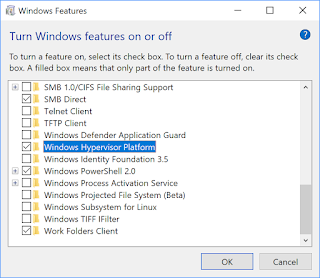
  6. ✔️Windows Hypervisor Platform enabled
  7. ???
  8. ❌Profit

Yes yes all done, but why am I still getting the HAXM error message? I checked for any other blog posts with the AMD tag but in the past 2 years nothing else has been posted for Ryzen.

They also point you to a troubleshooting page which pretty much gave the same instructions as the blog post.

So what the hell am I doing wrong? Nothing. The docs are wrong.

Image result for principal skinner kids are wrong

There is one crucial step missing from most results on the first page of Google when it comes to this issue and I even had trouble finding it on Stack Overflow and Reddit.

By chance, I thought "if Intel needs HAXM drivers, maybe AMD does too". So I took a look in the SDK manager and there it was sitting quietly in the second tab.


  • Open up Android Studio
  • From the top menu, click on Tools > SDK Manager
  • Expand the tree from Appearance & Behaviour > System Settings > Android SDK
  • Click on SDK Tools
  • Tick "Android Emulator Hypervisor Driver for AMD Processors (installer)"
  • Click OK or Apply and let it install
  • Once its finished, open up your Android SDK folder and navigate to "sdk_path\extras\google\Android_Emulator_Hypervisor_Driver"
  • Right click "silent_install.bat" and run with Administrator rights

Now you should be able to run AVDs at a decent speed.

I wish Google would take the time to update their own docs regarding this. It's literally one or two extra lines.

Source

Getting Python 3.6 build tools working on Windows

What an annoying process this has become. Used to be "download this exe, install and carry on".

Didn't bother with Python 3.7 since a lot of libraries were breaking on Linux.

Downloads

Grab Microsoft Visual C++ 14.0 standalone: Build Tools for Visual Studio 2017 (x86, x64, ARM, ARM64).

Setup

  • Run vs_buildtools.exe
  • Wait for it to download a bunch of files for "Visual Studio Installer"
  • Click "Individual components"
  • Select "Compilers, build tools, and runtimes" > "VC++ 2017 version 15.7 v14.14 latest v141 tools" (or whatever is latest)
  • Select "Development activities" > "Visual C++ Build Tools core features"
  • Select "Windows  10 SDK (10.0.17134.0)"
  • Everything else needed will be automatically selected for you.
  • Last chance to change "Installation location" at the bottom
  • Go grab a coffee or tea.

All up it should take about 3.03gb in space.

image

Summary on the side should look something like this

Source

Fix Windows 7 getting stuck on "Checking for updates...", high CPU usage or installing updates

So my friend's computer has had issues with getting updates since day 1. I didn't really know why, but at the time a lot of the responses online was to leave it running overnight and hope for the best.

Eventually, my computers became victim to the same issue. For months, Windows Update would get stuck on the "Checking for updates..." or hang when trying to download the updates.

windows updates chcekingwindows update scanning

It also pegs a CPU core to almost 100% usage (or 25% in quad cores and 50% in dual cores) under the process "svchost.exe" while it searches aimlessly, wasting valuable battery life and compute cycles on something that should be sitting quietly in the background.

Note: svchost.exe is used to host many services, but in my case after stopping the "Windows Update" service, the CPU spike stopped. If this isn't the case for you, then you have another problem.

I stumbled upon some information by chance which described the issues. Apparently there were some changes to Windows Updates which fixes these issues, but only made available through optional rollup patches.

1283775594667

Great logic there Microsoft. You've fix your updater but made it optional, so anyone who uses it has to go on a wild goose chase in order to get it working.

These rollup patches come in a form of rollup updates, which basically mean they're a monthly service pack.

Before you continue... Service Pack 1 is required!

Make sure you're on Windows 7 SP1!

Right click on "My Computer" and select Properties. That'll give you the service pack information under "Windows edition".

If you're not on SP1, go to Windows 7 and Windows Server 2008 R2 Service Pack 1 (KB976932), click download and select either:

  • windows6.1-KB976932-X64.exe (64 bit)
  • windows6.1-KB976932-X86.exe (32 bit)

And depending on how long your updater has been broken for, you'll also need the April 2015 service servicing stack update. For most people this shouldn't be a problem. Only download and install it the fix process complains.

The fix

  • When it's done, disable the Windows Update service from running in the background. This will speed up installation of the update by a great amount.
  • To disable it, find command prompt in the start menu, right click, run as administrator and paste in:

sc stop wuauserv

  • Go to the Update for Windows 7 file and run it
  • Click through the prompts and let it do its thing. After a while, it'll ask you to restart. Hope you've got some time because it takes a while!

DSC_1012

Stays on 13% for ages! Worst quality photo, no apologies.

  • Once you're back into Windows, make sure that Windows Updates works by clicking on "Check for updates". It should work much faster (within a few minutes) like it used to!

imageAs you can see, this computer hasn't had a proper update since June...

  • If it shows new updates available quickly then you should be on your way.
  • Install the updates to test it out. Everything should be working perfectly now.

image

So now you should have gone from a computer which takes about 10 minutes to scan for updates to one that scans within a minute. And now the updates should actually work!

1461611048714

Sources

Windows: Uninstall "Get Windows 10" notification tray icon

It's nice that Microsoft has gone out of it's way to promote their new operating system, but I would have greatly appreciated a "don't remind me again" option.

Right clicking it didn't show anything useful either.

image

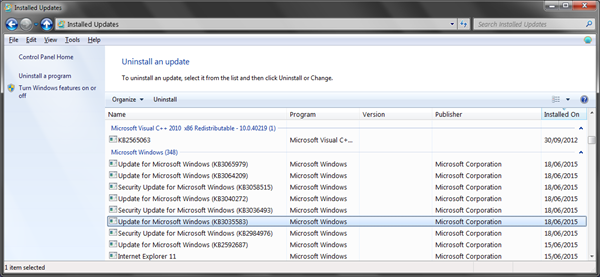
After checking "Windows Update" history for recent updates, lo and behold I found KB3035583 "Update enables additional capabilities for Windows Update notifications in Windows 8.1 and Windows 7 SP1", which is a sneaky way of saying advertisement.

How to get rid of it?

  • In Windows Update, click on "Installed Updates".

image

  • Sort it by date and find KB3035583 under "Microsoft Windows".

image

  • Select it and click uninstall.
  • Click yes to confirm.
  • Once it's done, reboot for it to take effect.

PUBLISHED by catsmob.com
Next time Microsoft, please don't surprise me in the wrong way.

Windows: How to disable WinSat.exe (System Assessment Tool)

So I was coding away at 1am on Sunday (as night owls would) and suddenly my computer switches off Aero and goes crazy with CPU usage, causing heat hot enough to cook an egg and the fan to go absolutely ballistic.

I checked out the cause and it turned out to be WinSAT.exe started up on it's own and decided to max out one of the cores. Turns out this is a task it runs periodically to rate the computer's performance.

Well, I personally don't need this and odds are you won't either.

To turn it off:

  • Start > Task Scheduler (taskschd.msc)
  • Find Task Scheduler (Local)
  • Task Scheduler Library
  • Microsoft > Windows > Maintenance
  • Right click WinSAT
  • Select disable.

1196

Enjoy the full use of your computer again.

Run Windows 7 on a OSX (Macbook Air, Pro, etc) with Bootcamp

Although the instructions are for Windows 7, the same should apply for Windows 8.1.

Preparing your USB installer

  • Insert the USB you want to use as the "install source"
  • Copy your Windows 7 ISO file to the desktop
  • In the Spotlight (magnifying glass in the top-right corner of your screen), type in "bootcamp"
  • Select "Boot Camp Assistant"

IMG_20150126_194027

  • Click continue to pass the intro screen
  • Select "Create a Windows 7 or later version install disk"
  • Select "Install Windows 7 or later version"
  • It'll automatically select the ISO file for you and the destination disk, but double check it just to make sure.
  • Once ready, click continue
  • Confirm you're OK with wiping the destination USB.
  • Wait ages for it to copy files to USB.
  • At the end of that, it may ask you to plug the Macbook into a power source (if you're running on battery)
  • Now is a good time to ensure that you're connected to the internet. If you don't, it'll make you restart the bloody process because you're not online... Yes, it happened to me first time I tried this. You'll only get a notification with the "OK" button, no retry.
  • Now you'll have to wait for it to finish downloading Windows hardware drivers (about 1GB I think). This will take a really long time as well, so go play Shovel Knight or something.
  • Once it's done, select how much space you want to allocate your operating systems. I pretty much gave as much space as I could to Windows because there's no intention of coming back to OSX.
  • It'll automatically reboot into the Windows setup after it's done resizing the partitions.

IMG_20150126_205229

Installing Windows

This step is pretty straight forward. The only thing you need to make sure is that you format the bootcamp drive appropriately.

  • Select "Custom (advanced)" when you get to the "Which type of installation do you want?" screen
  • Select the "BOOTCAMP" drive
  • Click "Drive options (advanced)" to reveal more options
  • Click "Format"

IMG_20150126_205904 IMG_20150126_205921

  • Give it time to install and prepare Windows. It'll automatically reboot once or twice during that process.

Configuring Windows

Once you're in Windows, there's a few extra steps are involved in making the operating system more tolerable for day to day use.

Assuming you still have the installation USB plugged in:

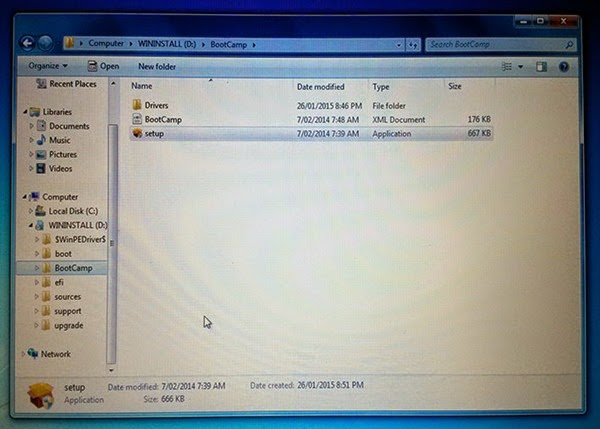
  • Open up Windows Explorer and go to X:\Bootcamp\ (where X: is your USB drive, labelled WININSTALL).
  • From there you can find the Bootcamp setup for Windows.
  • Run the setup

IMG_20150126_211318

  • This will automatically proceed to install driver software for your hardware such as touchpad, graphics card, motherboard, webcam, etc.
  • It'll need to restart your computer before you can continue.
  • Once you're back in, look for "Boot Camp" in the start menu.

IMG_20150126_212031

  • Once you're in, go to the "Keyboard" tab and tick "Use all F1, F2, etc keys as standard function keys"
  • Go into "Trackpad" and configure the trackpad to your liking. Look at my configuration if you're unsure what you want as "normal" settings.
  • That should be everything needed for you to get up and running with Windows on a Macbook.

 IMG_20150126_212138

Sources

Installing Windows 10 Tech Preview on Virtual Box

Downloads

First of all, you'll need the Windows 10 Tech Preview ISO. You can get it from Microsoft's download page. I grabbed English 64-bit (x64), which was "WindowsTechnicalPreview-x64-EN-US.iso"

Setting up the VM

Back over in Virtualbox-land, as per usual you just create a new virtual machine for Windows 8.1 and matching the build you've got (x86 or x64). I'll assume you got the x64 build. Everything is per usual, create a new hard-drive, etc.

Once you're done, go to "System" settings for that VM. Despite what another guide has wrongfully stated, make sure that "Enable EFI (special OSes only)" is OFF and under the Processor tab that "Enable PAE/NX" is OFF as well. If these are left on, you won't be able to enter the installation process.

Lastly, go to "Storage" and select the CD icon from "Storage tree". Click on the CD icon on the right and select "Choose a virtual disk file", then select your Windows 10 ISO file.

Installation

Nothing out of the ordinary here. Takes about half an hour on a regular non-ssd HDD.

It installs smoothly just like Windows 8.1 and even has the same wizard process during the first boot.

1 2 

Yay, store apps. Exactly what I didn't want.

3 
That bloody "Almost ready" was there for a frikken long time!
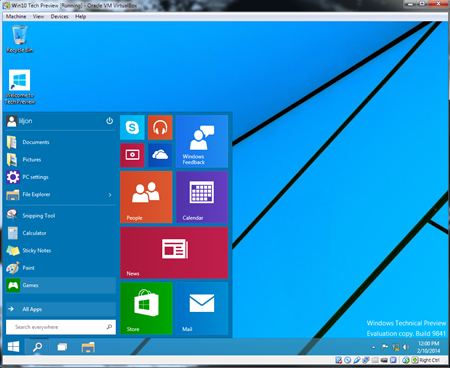
5

Unfortunately, there isn't any visible way of getting rid of that list of apps from the start menu.
I'll find a way by reworking my BreadCrumbKiller or SPASM programs.

To get rid of the live tiles from your Start menu, see here.

VirtualBox Guest additions

Majority of it works, but if you wanted the whole she-bang you can extract the drivers and manually install the video drivers.

  • Go to Devices > "Insert Guest Additions CD image"
  • Then open up command prompt in your VM.
  • Type:

cd /d D:

# If x64

VBoxWindowsAdditions-amd64 /extract /D=C:\Drivers

# If x86

VBoxWindowsAdditions-x86 /extract /D=C:\Drivers
  • Wait for it to finish.

image

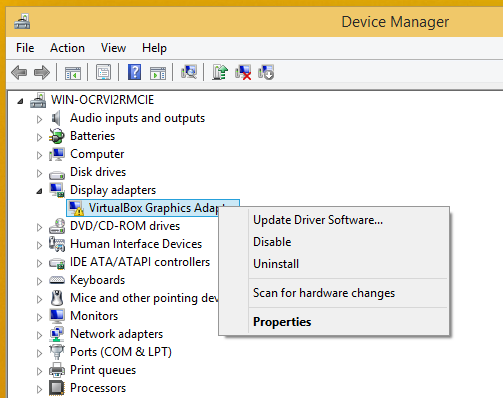
  • Open up Device Manager and find the "VirtualBox Graphics Adapter".
  • Right click it and select "Update driver software"
  • Browse my computer for driver software
  • Click Browse
  • Select C:\Drivers\
  • Next
  • Done!
Connect Wireless XBox 360 Controller(s) to your Windows PC

To further my quest to get 4 player Castle Crashers up and running on my computer, I needed to make use of both my PS3 and XBox 360 controllers. (Here's the guide to get the PS3 controller working on PC via USB cable or bluetooth)

Rather than using a standard bluetooth dongle, the Xbox 360 controller requires the purchase of a "XBox 360 Wireless Gaming Receiver For Windows" which allows you to connect up to 4 control pads.

The great thing about this is they don't have to cost much if you're ok with getting a cheap knockoff.

Hardware Requirements

  • A USB wireless controller receiver (I got mine for $8 delivered from eBay)
  • A wireless XBox 360 controller from DX.com (You can get replicas for cheaper, but legit ones feel better)

The link seems to have died, so here are some alternatives:

Software Requirements

Setup

  • First of all, install the drivers. This ensures you've got everything in place ready to go.
  • Then plug in the wireless receiver into a USB port.

image

  • If Windows automatically detects the drivers for it and gives you the thumbs up then you're good to go!


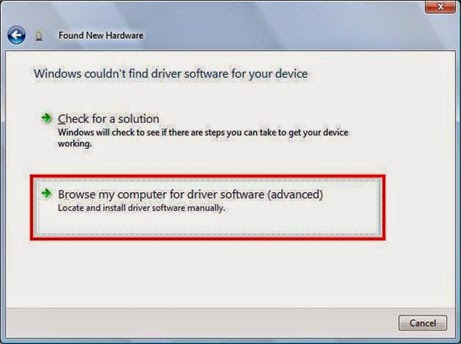
  • If not, you'll have to manually select the drivers. Don't fret, it's not that hard.
  • Open up the Control Panel
  • Click on Device Manager
  • Expand "Other devices" and right click on "Unknown device"
  • Select "Update driver software"
  • Click "Browse my computer for driver software (advanced)"

64bit2

  • Select "Let me pick from a list of device drivers on my computer"
  • Select "Microsoft Common Controller for Windows Class" and click Next
  • Select "Xbox 360 Wireless Receiver for Windows" and click Next
  • Click Yes when prompted to confirm
  • It should now be successful.

Pairing the wireless controller with Windows

Surprisingly, this didn't work for me straight off. Not because of hardware or software but because of batteries. Yep, apparently if the batteries are weak it won't pair. The only way you can really know is to try it.

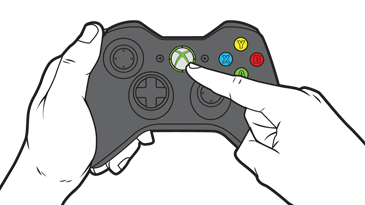
  • First you need to turn on the controller. Hold the big X button in the middle until it flashes

image

  • Then press the sync button on the receiver.

image

  • Lastly, press the sync button on the controller

image

  • After a few seconds it'll connect and stop flashing

image

An easy way of testing the controller is to just run Steam on Big Picture Mode. If you can navigate the menu using the controller then you're onto a winner!

Dghtrx8
Yep, it's really working. Try not to look so surprised!

Sources

How to use your PS3 Controller (DS3 / Dual Shock 3) on a Windows 7 x64 PC

For the longest time I've been looking for a way to use my PS3 controller on PC for Castle Crashers so I could get the 4th player in on the action, but most of the time the instructions were to use MotionInJoy (which is a complete piece of steaming shit). (Here's the guide to get a wireless XBox 360 controller working on PC)

Eventually I stumbled upon something by Scarlet.Crush on the PCSX2 forums called "XInput Wrapper for DS3 and Play.com USB Dual DS2 Controller", or better known as "SCP DS3" which lets you do just that.

This post covers the PS3 controller information, but the steps are the same for the PS4 controller (Dual Shock 4)

How it works

Scarlet.Crush wrote drivers for the Dual Shock pads and interfaced them with the XInput API, which allows games or programs to interact with the XBox Controller.

No more arcane hacks to get it working. If anything, this is actually pretty clever.

Hardware Requirement

  • PS3 or PS4 controller
  • USB cable
  • (optional) One USB bluetooth dongle / adapter for up to 4 controllers if you want wireless connectivity

(The dongle I bought also works for Wii remotes)

Software Requirements

Installation

  • Install .NET 4 package (if necessary)
  • Install the XBox 360 controller driver package (Windows XP/Vista users should install this AFTER installing the SCP drivers)
  • Restart if asked to.
  • Important: Connect your bluetooth dongle and let Windows do it's thing.
  • Important: Connect your PS3/PS4 controller and let Windows install the default drivers.
  • Extract the contents of "ScpServer\bin" from "SCP-DS-Driver-Package-1.2.0.160" to where you want to put it. Personally I put it into "C:\Games\Utils\SCP-DS3\"
  • Run "ScpDriver.exe"


image

  • Click "Install" to install the SCP driver, bluetooth driver and SCP service (maps controller input to XInput).
  • Once it's done, you can exit.

Testing it

  • Run "ScpServer.exe" to take a look at how things are running.
  • Your controller should automatically pair (check for 1 LED lit up instead of 4 flashing lights)
  • Go to "Devices & Printers" in your control panel and you should see a "PLAYSTATION(R)3 Controller" AND an "Xbox 360 Controller for Windows".
  • Right click the Xbox controller icon and select "Game Controller Settings" > Properties.
  • From there you can try out all the buttons


image

  • Unplug it from USB to check if bluetooth is working. It should stay paired with the computer but remove the DS3 controller icon.

If bluetooth is not working

RZZQq4N

If this happens...

  • Unplug everything
  • Start up "ScpDriver.exe"
  • Click uninstall
  • And start again. Except this time, select "Force install" when installing the drivers with "ScpDriver.exe".

This happened because my USB Bluetooth dongle wasn't on the supported list, but forcing the install MAY work for you. <insert usual "your milage may vary" disclaimer here>

Sources

Windows Update: heavy CPU usage after .NET framework update

I'm seeing some pretty heavy load, something like 90-100% on all cores and my temperature maxing out to 84°C!

image

After a quick look at Task Manager, TrustedInstaller.exe is the cause but what it's really doing is running a setup task for the .NET framework.

I don't mind that Microsoft is doing optimisation on their huge .NET library, but at the same time I would appreciate if it didn't try to cook my hardware while it's at it. I spent quite a pretty penny on my notebook and would like to keep it running for as long as possible.

BbyyGut
How Microsoft treats my notebook CPU during updates.

Go to your "Services" manager by typing in "services.msc" into the Start Menu. This will show you a list of services on your system.

image

Search for the entries beginning with "Microsoft .NET Framework NGEN" and check the status. If it's running, go to it's properties and stop it. An additional but optional step you can take is disabling it.

You should see an instant drop in CPU usage after doing this.

image

 
Copyright © Twig's Tech Tips
Theme by BloggerThemes & TopWPThemes Sponsored by iBlogtoBlog