jQuery: Check if a checkbox is checked or set the checked state

To test if a checkbox has been ticked is a bit tricky.

Using val() will return the potential value of the checkbox, regardless of its check state.

Instead, use the following line to test its state:

$("#checkbox").attr('checked')

This will return true or false depending on its checked state.

*update 27/07/2011*

Use the new .prop() function:

$(".myCheckbox").prop("checked", true);
$(".myCheckbox").prop("checked", false);

jQuery 1.5 and below

The .prop() function is not available so you need to use .attr().

To tick the checkbox (by setting the value of the checked attribute)

$('.myCheckbox').attr('checked', 'checked')

and un-checking (by removing the attribute entirely)

$('.myCheckbox').removeAttr('checked')

Sources

Ubuntu and LinuxMint: Disable Routine check of drives

It's funny when Linux enthusiasts bag out Windows (even if they haven't used it since Windows 3.11 or 95), especially when they say "oh look another update" or "damn its scanning again".

What's funnier is that they defend it when Linux displays similar characteristics such as, oh I dunno, "routine check of drives"?

This is even more annoying than Windows because it scans on both fixed time periods and after a certain number of boots. At least Windows only checks after a crash.

image
Pot kettle black anyone?

Anyone, to disable this annoying feature, you need root access.

Then open up a terminal and type in:

sudo tune2fs -c 0 -i 0 /dev/sda1

Where sda1 is your device name. You'll need to do it for all drives.

Most sites will only give you the -c option, which is fine because that disables the automatic scan after X number of boots.

But you'll also need the -i flag to disable the scan after a certain time period such as "1 week" or so.

[ Source, Linux user hypocrisy ]

"The check is there for a reason, not to annoy you. If you disable it then you put your files and data at risk"

"In Jaunty, the time for the check is minimal and beats trying to remember to run scandisk in Windows"

Bulletstorm: Game crashes straight away with kernel32.dll error

As I excitedly clicked on the Bulletstorm icon after it installed 7gb worth of data, the screen turned black and a sound played for 1/20th of a second.

I almost cried when I saw an error message when the game refused to load and spat me back out to the desktop.

image

bulletstorm Rendering thread exception: Result failed   at c:\depot\UnrealEngine3-BSG-PC-Ship\Development\Src\D3D9Drv\Src\D3D9Viewport.cpp:178   with error D3DERR_DRIVERINTERNALERROR  Address = 0x7c812afb (filename not found)  Address = 0x485b31   (filename not found)  Address = 0xe8785ad5 (filename not found)

Seriously, do they not test games anymore?

I tried:

  • Updating drivers, which caused more instability than good
  • Updating NVIDIA PhysX, which did nothing
    (I'm noticing alot of people looking for a PhysX fix. I haven't had any problems with it, but there's a potential fix for that in the Game Brood link below)
  • Reinstalling the game, which does nothing
  • Tried cracking it, which also did nothing
  • Installed the Windows XP hotfix for Games For Windows Live, which didn't even install properly! FUCK GFWL!

Eventually I stumbled upon an old thread for Unreal engine SDK support for others who had similar error messages.

The problem

Apparently the Unreal 3 engine does not like the ATI Radeon x1900 and x1950 chipset. According to the devs and testers in the development thread, the common factor between all of them are the graphics card.

There is no easy fix for this, you and I are just gonna have to get a new card.

The solution

The method suggested by AdAstra was to change bInitializeShadersOnDemand=False in the "BaseEngine.ini" config file to True.

Now, where the hell would I find this for Bulletstorm? Ah-HA!

My Documents\My Games\BulletStorm\StormGame\Config\StormEngine.ini

What the hell? Who the fuck encrypts INI files!? How the fuck are people supposed to fix their own problems if you're fucking locking this shit up!? Excuse the French but fuck you Epic, you're pissing me off a lot today!

helmet2
Despite all my rage I'm still just a rat in a cage

Luckily, I found BulletstormINIeditor by Alexx on a massive crash debugging help page. This magnificent bastard created a quick and dirty program to view and save the encrypted INI files.

Fire it up, open the file and it'll automatically display in the box.

image

Copy that text out to Notepad and search for "bInitializeShadersOnDemand". Change "False" to "True", paste everything back into the INI editor and then save.

Your game should now load. Any other crashes should be generic ones so you can refer to Game Brood for a compilation of potential fixes.

Now enjoy getting the fucking stupid GFWL to work.

Sources

Facebook: Disable new theatre photo viewer

Facebook's new lightbox style photo viewer is a bit of a love/hate thing for me.

image
Image from azharkamar

One side, it shows pics in a larger resolution and makes flicking through a lot easier.

On the other, its huge and pushes down the tags/captions/comments so I can't see shit Captain!

image

To temporarily disable it for the current photo, simply press F5 and it'll refresh in the old view.

Unfortunately, the temporary fix will re-enable the theatre once you click on the next photo.

To stop that, edit the URL for the current page and remove the "&theatre" bit at the end.

I'm sure there's a more permanent way of fixing it using a Greasemonkey script but I haven't gotten to that point yet.

Windows: No audio when plugging HDMI cable into TV

This had me stumped for some time. It was easy enough plugging the laptop into the TV via HDMI and getting the video to work.

But one thing that baffled me was why the audio wasn't coming out of the TV. Am I missing the latest drivers for my NVIDIA GeForce 8400M?

I followed the typical debugging checklist:

  • Cable plugged in properly?
  • Is something actually playing? Open an MP3 on loop to test.
  • Doh, sound was on mute. Wait, still not working!

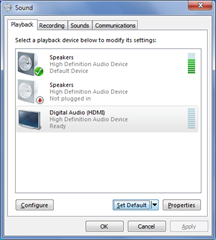
First thing I was doing wrong was spitting sound out to the default speaker. Once HDMI is plugged in, you should have a new option to stream the sound out to the HDMI channel.

To change that:

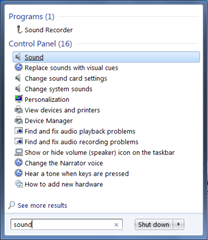
  • Go to the Sound section in the Control Panel.

hdmi-1

  • Find the HDMI channel and set it to the default by clicking "Set Default" at the bottom.

hdmi-2

But even then my sound wasn't coming through! What the hell!?

Curiosity got the best of me and I decided to go through the options. Lo and behold, my answer was found.

  • Click on "Properties".
  • Go to the "Levels" tab.
  • Slide the bar to the recommended level (it was 50 for me)

hdmi-3

Now you should have sound coming from your TV! Time to bask in the glory of baby armour.

baby-armour 

Research

Despite all the research, nothing came up conclusive for me apart from the levels setting.

If the levels setting doesn't work for you, some other stuff to check are:

  • Drivers MAY matter for some people.
  • Turn your computer off and then plug in your HDMI cable. Start the computer up with the cable already in.
  • Ensure the TV speakers are not muted and accepting audio from the right source.
  • Check your volume control settings on Windows and see if you've selected the right output channel.

Android: Display alert dialogs

It is useful to display confirmation dialogs in your app to prevent accidental presses.

There is an inbuilt feature to do that, and its called the AlertDialog Builder.

This may look a bit messy, but its all chained together. You can split it up into separate calls if you want to make it look a bit neater.

AlertDialog.Builder ad = new AlertDialog.Builder(activity);
ad.setIcon(android.R.drawable.ic_dialog_alert) .setTitle("Quit game?")
.setMessage("Are you sure you want to leave this game?")
.setNegativeButton(android.R.string.cancel, new DialogInterface.OnClickListener() {
@Override
public void onClick(DialogInterface dialog, int which) {
// User said no, resume game?
}
})
.setPositiveButton(android.R.string.ok, new DialogInterface.OnClickListener() {
@Override
public void onClick(DialogInterface dialog, int which) {
// Stop the activity
}
});

ad.show();

Android: How to open a webpage

There's more than one way to skin a cat here. It really depends on exactly what you want to do.

First of all, you'll need to give your app the right privileges for using the internet and add "android.permission.INTERNET" to the permissions.

Clickable links in a text-view using Layout

This is the easiest way of doing it without coding.

  • While editing your XML layout, click on the view you wish to apply auto-links to.
  • In the Properties dialog, edit "Auto links" and set it to all that apply to you.
  • Set "Links clickable" to true.
  • Whalla!

Clickable links in a text-view via code

If you prefer the more code-saavy way of doing it, then use this snippet to make your links clickable.

TextView tv = (TextView) findViewById(R.id.textview); Linkify.addLinks(tv, Linkify.WEB_URLS);

Display HTML in a view

Manually fetching or setting HTML into a view is quite easy.

Or you could tell the view to load the remote page for you.

WebView wv = (WebView)findViewById(R.id.webview);
wv.loadUrl("http://www.thatawesomeshirt.com");

Open up the built-in browser

Lastly, just let the pro's handle it. Send off your request to the default web browser on your Android handset.

Uri uri = Uri.parse("http://twigstechtips.blogspot.com");
startActivity(new Intent(Intent.ACTION_VIEW, uri));

[ Source ]

Android: Disable screen rotation in your Activity

I have a certain activity that is designed to be run in a particular orientation, but upon testing I found that it automatically rotates to adjust itself when needed.

You'll have to do a little manifest editing in order to get this working.

Note: This will also affect the keyboard orientation in your activity.

Manually

<activity ... android:screenOrientation="portrait">

Add the android:screenOrientation attribute to your activity. You'll need to do this to all activities which you want to keep oriented.

For a full list of values, see the Android documentation.

The click-click way

  • Open up your manifest and go to the "Application" tab in Eclipse.
  • Select the activity which you wish to lock.
  • On the right, scroll down to "Screen Orientation"
  • Select the value you want.
  • Profit!

Android: Rotate the screen on the emulator

To rotate the emulator sideways, press CTRL+F12 on your keyboard.

This will spin the window sideways so you can test what happens when your app rotates.

[ Source ]

Firefox: Just got a little bit more respect in my books :)

image

I couldn't help but smile when I saw this.

Atomic Bomberman: How to open RSS sound files

One of my favourite Bomberman games of all time. Insanity, loads of hidden features, wide variety of levels which affect your character, great music that gets you going and a VERY amusing array of character voices/insults.

imageimage
They just don't make games like this anymore.

So after 15 years or so, I wanted to grab some music off it for my MP3 player. Unfortunately, I completely forgot how to read the RSS file formats which the game uses.

As I discovered from GoldS on tcrf.net, the files are in a raw sound format, so RSS (back in the 90's) presumably stands for raw sound stream.

I couldn't get this to read properly in Adobe Audition, so I tried out an alternative called Goldwave.

When you've got this installed:

  • Open or drag in the sound file you want to play
    image
     
  • The default settings are perfect for opening the sound streams.
  • Leave it as Raw (snd, raw), PCM signed 16bit, little endian, mono, 44100 Hz.
  • Click OK and you can listen to it.

To batch process the 2,037 files, you'll need to define the format first. Otherwise, prepare to click "OK" 2,037 times upon import.

  • In the main menu, go to "Options" > "File Formats"
  • On "Undetectable types", click "Add"
  • Enter in "RSS" for the extension and copy the settings from above.
  • Save it and use batch process from the "File" menu.

I sure hope Interplay don't mind me giving these instructions out, but it's still an awesome game after so many years!

[ source, download ]

Facebook: Get newsfeed from ALL your friends, not just recent-activity ones

You may have noticed lately that you're only seeing updates and getting comments from the same people.

Facebook made a change so you only see posts from people you interact with regularly, which kinda sucks because isn't it supposed to help you keep in touch with people?

To change this:

  • Scroll down to the very bottom of the newsfeed on your homepage.
  • Click on "Edit Options"
  • Click on "Show Posts From"
  • Change the setting to "All Of Your Friends and Pages"

image

Sony Xperia X10 Mini - Setting up USB drivers for Android debugging

I hate having to install software suites just to get the device to detect on my machine. More annoyingly, those software suites usually come with a bunch of shit I never need.

So, I extracted a set of files from the Sony Companion 2.01 installer which contained the drivers and installed JUST that manually.

Steps to get the drivers

You have two choices. If you want to trust the file I've uploaded, then download it here. They came from "Sony_Ericsson_PC_Companion_2.01.110.exe"

Otherwise, you can get it directly from Sony and extract it yourself.

  • Download PC Companion 2.0 from the official site.
  • Run the installer so it shows up but do NOT advance through.
  • Go to %TEMP% in Windows Explorer and search for "CurrentSigned.cab"
  • Copy it to a safe place.
  • Close the installer without installing anything.

Installing the device

  • Extract the contents of CurrentSigned.cab and you should see 2 folders, "x86" and "x86x64".
  • Plug in your phone.
  • Windows should ask for drivers for it.
  • Tell it to look at the "x86x64" folder.
  • It should automatically know what to do from there.
  • Enjoy bloat free debugging!
16iL4

Can't download drivers or software from HP's FTP site?

If you've tried downloading drivers or software from HP's support site, you'd soon realise that most if not all of their links to the FTP are broken.

It's shameful that such a big company hasn't fixed up their support section after so long.

Luckily, there's an easy fix for us.

Copy the URL to clipboard and modify it to HTTP.

eg. If the link is ftp://ftp.hp.com/pub/softpaq/sp48501-49000/sp48801.exe, then just change the "ftp://" bit at the front to "http://" and it'll work.

1291664255
My job here is done. Thank you.

[ Source ]

HP Mini - How to get into the BIOS settings

When the computer first boots up, quickly tap F10 to get into BIOS.

From the boot menu, you can disable the quick-start feature and get it to load straight into your OS of choice.

Windows XP/Vista/7: Run program as a service

Open up a command prompt in Admin mode and type in the following command.

If any of the paths include spaces, you have to use (escaped) quotes around the path, like this:

sc create subversion binpath= "\"C:\Program Files\Subversion\bin\svnserve.exe\" --service --root C:\ServerFiles\svn_repository" displayname= "Subversion" depend= tcpip start= auto

A simplified pseudo version of the call is:

sc create shortname binpath= "\"C:\Path\To\Your\program.exe\" --your-program-options" displayname= "Full Name of Service for Service Manager" start= auto

A breakdown of the command arguments is shown below. Strangely enough, the space after the = sign is required.

  • "sc create subversion"
    Creates a service named "subversion".
  • "binpath= "
    The executable file.
  • "--service"
    (Argument to SVN) Run it within the Windows native service wrapper. Shows how you can pass arguments to the executable.
  • "--root= "
    (Argument to SVN) The root folder for repositories. Also shows how you can send arguments to the executable.
  • "displayname= "
    A nice name for the service in the Service Manager.
  • "depend= "
    Dependencies for this service.
  • "start= "
    The starting method.

For more information, see the Microsoft's KB251192.

If you typed something wrong, type "sc delete subversion" to delete the service and start again.

Once created, type "net start subversion" to start it.

C++: Setting up a Win32 timer

One of the most basic things in programming is setting up a timer. After a certain amount of time, it'll trigger a function you've defined.

To create a timer, we use the SetTimer() function.

UINT_PTR SetTimer(
HWND hWnd,
UINT_PTR nIDEvent,
UINT uElapse,
TIMERPROC lpTimerFunc
);

Now depending on your usage, the timer ID may vary.

  • If hWnd is NULL, then the timer ID is the return value.
  • If hWnd is valid, then the timer ID is nIDEvent.

The uElapse is the delay in millseconds.

Also note that you should kill a timer after you're done with it using KillTimer(timerID).

Depending on your application or DLL, you may choose between using a callback or receiving a WM_TIMER message.

Using a callback function

The callback function TIMERPROC is in the format of:

VOID CALLBACK TimerProc(
HWND hwnd,
UINT uMsg,
UINT_PTR idEvent,
DWORD dwTime
);

This method requires you to set up the callback function and pass it as lpTimerFunc.

Using the WM_TIMER message

Set a valid target for hWnd and set lpTimerFunc to NULL.

When the timer expires, the WM_TIMER message will be sent to your hWnd.

Process it in your WndProc() function and check wParam against the timer ID.

switch (uMsg) {
case WM_TIMER: {
if (wParam == YOUR_TIMER_ID) {
// Perform your timer code here
do_timer_stuff();

// Return 0 to indicate it has been processed.
return 0;
}

break;
}
}

[ Source ]

Django: Get current site domain and URL

It'd be helpful to add this information into a context processor for easy access from your templates.

To get the current site information:

from django.contrib.sites.models import Site

site = Site.objects.get_current()

Use "site.domain" to retrieve the domain.

To get the current requested URL:

request.REQUEST.get('page') or request.META.get('PATH_INFO') or ""

The HTTP_REFERER is accessible through:

request.META.get('HTTP_REFERER', "")

And the query args:

request.GET.urlencode

Reminder: All of the .get() functions may return None, so either give it a default value of "" or allow for null values in your models.

C++: Detect when Windows Explorer has crashed

Despite excellent progress from the days of Windows 95, Windows Explorer is still prone to the random crashes here and there; may it be out of spite after years of user stupidity, hardware problems, rogue software installed, hacked system files which compromise stability or just a random act of cruelty from a supernatural force.

imageAs a developer, it's our duty to keep our programs working as well as possible. Little things which keep our program accessible after an Explorer crash such as restoring the taskbar icon will make users happy.

Fortunately, it's easy enough to detect when Explorer crashes. I guess Microsoft got used to problems within 3rd party software not doing stuff right and implemented an event for it.

In your header file, define a message called WM_TASKBARCREATED.

UINT WM_TASKBARCREATED = 0;

In your InitInstance() call, after the handle is created:

// Set up a message to detect when Explorer has crashed
WM_TASKBARCREATED = RegisterWindowMessage(TEXT("TaskbarCreated"));

This will register a message for the duration of your program. It will automatically be discarded when the program ends.

Finally, add a handler for the message in WndProc():

switch (message) {
case WM_COMMAND:
...
break;

case WM_DESTROY:
...
break;

default:
// If Explorer has crashed/restarted, re-initialise the program
if (message == WM_TASKBARCREATED) {
// Put your crash handler code here, or make a function and call it from here
}
break;
}

The reason we put it into the default is that switch blocks need hardcoded values to work, but our WM_TASKBARCREATED message value is assigned everytime the program is run.

Note that tray icons for Windows features (such as network icons, sound, etc) have a brief delay of about 3-5 seconds before restoring themselves.

I would also advise to follow that practice and use a timer to handle the crash-restore code. Restoring something immediately before Explorer has fully initialised may cause it to freeze up, leaving your system in an unusable state.

Sources

VMware: Change boot sequence to load CD

I wanted to try out a copy of ophcrack live CD and realised I had a bit of trouble pressing F2 quick enough to get into the BIOS settings.

It's tricky because it skips that screen so quickly, but you can use the mouse to give focus to the VM and press F2 as quick as possible.

Luckily, we can add an artificial delay so it'll give us humans a fighting chance at changing some BIOS settings for the VM.

  • Go to where you VM files are located.
  • Look for the ".vmx" file.
  • Open it up in notepad.
  • Add (or find) the line which has "bios.bootDelay"
  • Add bios.bootDelay = delay in milliseconds

If you want it to wait 3 seconds, use the value of 3000.

[ Source ]

PSP: Running Homebrew Enabler (HEN) directly from XMB with 6.35

With the discovery of the PSP keys within the PS3 firmware, homebrew can be run directly from the XMB as they are signed with the official signatures.
Using the original firmware, you can run a signed copy of HEN straight from the XMB without having to run any "Minna no Sukkiri (demo)" exploits.
To do that, you'll need:
  • PSP original firmware v6.35
  • A way to access the memory stick.
  • A signed version of HEN (I'm using liquidzigong's 6.35 PRO)
  • The rest of the instructions for setting it up are the same as homebrew for 6.31 except you do not need to do anything related to "Minna no Sukkiri" demo/save data.
If you need to update, the firmware updates go into ms:\PSP\GAME\UPDATE

Installation

  • Move your current HEN files ("ms:\h.bin" and "ms:\hbl") to a backup folder (in case anything goes pear shaped).
  • Extract EBOOT.PBP from the HEN archive into "ms:\PSP\GAME\635PROHEN"
  • That is all.

Running

  • From the memory card, select "635 HEN by Coldbird & VF".
  • This will reboot your PSP as usual and then bring you back to the main menu.
  • Then select your homebrew (ie. Prometheus ISO loader) and enjoy!
  • This is living.
[ Source ]

Eclipse: Android development "Eclipse is loading framework information and the Layout library from the SDK folder"

When trying to view a layout in the drag and drop interface for the Android IDE, you may see this error:

Eclipse is loading framework information and the Layout library from the SDK folder. main.xml will refresh automatically once the process is finished

image
FFFFFFFFUUUUUUUUUUUUUUUUUU!

If that happens, then simply close Eclipse and open up the Eclipse plugins folder and search for "com.android.*".

The biggest version number is the one you should keep. Anything else should be removed.

image

In my case, I had 4 files to delete from v0.8:

  • com.android.ide.eclipse.editors_0.8.0.v200809220836-110569.jar
  • com.android.ide.eclipse.adt_0.8.0.v200809220836-110569.jar
  • com.android.ide.eclipse.common_0.8.0.v200809220836-110569.jar
  • com.android.ide.eclipse.ddms_0.8.0.v200809220836-110569.jar

Remove the old plugins and all should be well.

kitchen dance
Time for a victory dance.

[ Source ]

django: Set cookie expire time

Within your view, you can control certain aspects of the browser cookie. To do so, you access the set_cookie() method from within the HttpResponse object.

First, calculate the date/time when you wish the cookie to expire.

tomorrow = datetime.datetime.now() + datetime.timedelta(days = 1)
tomorrow = datetime.datetime.replace(tomorrow, hour=0, minute=0, second=0)
expires = datetime.datetime.strftime(tomorrow, "%a, %d-%b-%Y %H:%M:%S GMT")

Next, make sure you get access to the HttpResponse object.

#Response object
response = render_to_response('path/to/template.html', your_context_data, context_instance = RequestContext(request))

Finally, make a call to set_cookie() so you can set the expires arg.

# Cookie expires at the end of the day
response.set_cookie('read_count_%s' % content_type.id, value = read_count, expires = expires)

Sources

git: Spring cleaning and garbage cleanup on trees and branches

After using a repository for a while, its a good idea to clean it up as it accumulates junk.

Using "du -hs" to see how large the folder was, I found that my tree was 166M.

Git gc will do the magic for us.

Cleanup unnecessary files and optimize the local repository

Runs a number of housekeeping tasks within the current repository, such as compressing file revisions (to reduce disk space and increase ) and removing unreachable objects which may have been created from prior invocations of git-add.


Users are encouraged to run this task on a regular basis within each repository to maintain good disk space utilization and good operating performance.

So using:

git gc

and

git submodule foreach git gc

Git will go through and clean up the tree. Eventually everything was reduced down to 111M.

Other repositories were 78M and 100M. They were cleaned up to be 56M and 77M respectively.

jQuery: Set the content of an empty IFRAME

I had to do some JS trickery to implement a preview feature by posting via AJAX without having to reload the current page.

The problem I ran into was displaying the output into an iframe.

Assuming the HTML is:

<iframe id='preview-iframe' src="about:blank"></iframe>

We can use this jQuery command to inject the HTML into the iframe.

$('#preview-iframe').contents().find('html').html(data);

Update (18/01/13): Thanks Nikri for the IE about:blank fix!

Sources

jQuery: jQueryUI DatePicker with time component

I was looking around for a way to implement the Django AdminDateWidget/AdminTimeWidget but it seemed to be more trouble than its worth.

Looking around a few sites, the best I've found is "jQueryUI datetime". The demo page can be found here.

Syntax is incredibly simple.

$('#datetime').datetime({ value: '+1min' }); });

And that's it!

The good thing is that this is compatible with Django, as the date/time format is the same as the one which the DateTime field accepts, so you can still use the default validation of the Django fields in a form.

Python: Simple URL manipulation to add/remove GET args, change URL domain or path

With all the helpful libraries out there, you'd think Python would have an easier way of doing this!

Using urlparse() to get the ParseResult object only allows read-only access to the attributes, making it useless if you want to set the query field.

This solution comes from Ned Batchelder from StackOverflow. I found this to be much more useful than the stuff in urlparse and urllib libraries.

Create a helper class:

To get an idea of what's what:

txt = "https://gist.github.com/twig/d42c4ec9ecc5eccf3614#file-python-pil-exif-reader-py-L12"
url = Url(txt)
print "original", txt
print "scheme", url.scheme
print "domain", url.domain
print "path", url.path
print "args", url.args
print "params", url.params
print "query", url.query
print "query_string", url.query_string
print "fragment", url.fragment
print "URL", url.url
print "str", str(url)

Prints out:

original:       https://gist.github.com/twig/d42c4ec9ecc5eccf3614?q=url&l=python#file-python-pil-exif-reader-py-L12
scheme: https
domain: gist.github.com
path:   /twig/d42c4ec9ecc5eccf3614
params:
args:   {'q': 'url', 'l': 'python'}
query:  q=url&l=python
query_string:   ?q=url&l=python
fragment:       file-python-pil-exif-reader-py-L12
URL:    https://gist.github.com/twig/d42c4ec9ecc5eccf3614?q=url&l=python#file-python-pil-exif-reader-py-L12
str:    https://gist.github.com/twig/d42c4ec9ecc5eccf3614?q=url&l=python#file-python-pil-exif-reader-py-L12


To make changes, just use like this:

u = Url(url)
del u.query['page']
print u.url

*update 23/08/2011*

  • Removed the use of urllib.urlencode() because it's deprecated. Now uses urllib.
  • Added __str__() to accompany __unicode__(). Added build() method.
  • Renamed args to be query.

*update 11/11/2014*

  • Cleaned up the code a bit
  • Added Url.url and Url.query_string attributes
  • Updated comments
  • Renamed Url.netloc to Url.domain
  • Now supports Url and Django's HttpRequest objects in __init__()

Sources

 
Copyright © Twig's Tech Tips
Theme by BloggerThemes & TopWPThemes Sponsored by iBlogtoBlog